
Production Ready MongoDB Cluster & Nginx on AWS using Ansible and Terraform: Highly Available and Fault-Tolerant


Introduction
Hello, I'm Ankit, a DevOps, and Cloud enthusiast. I've recently completed a project and gained valuable knowledge. The project was guided by Piyush Sachdeva, and it's also part of the 10WeeksOfCloudOps series.
Synopsis
In this blog, I will demonstrate how to create a production-ready MongoDB cluster using Ansible and Terraform on the AWS cloud. Additionally, I'll explain how to configure Nginx for web app deployment. Moreover, I will showcase the GitOps approach for Infrastructure provisioning and configuring. This approach involves setting up pipelines for Infrastructure as Code (IAC) and configuration management.
story
The operations team writes Terraform code and Ansible roles or playbooks for automation and reusability. They push their code to remote repositories, facilitating team collaboration and restricting infrastructure access. Pushing to the remote repository triggers pipeline execution, which creates the required infrastructure and configuration management automatically, without human intervention.
For this project, we will have two repositories: one for Terraform code and another for Ansible playbooks and roles. Consequently, we'll create two pipelines—one for Terraform and another for Ansible. In the upcoming sections, we will delve into how Terraform and Ansible function and how they contribute to achieving desired outcomes. In brief, Ansible will establish a MongoDB cluster and install Nginx on multiple servers.
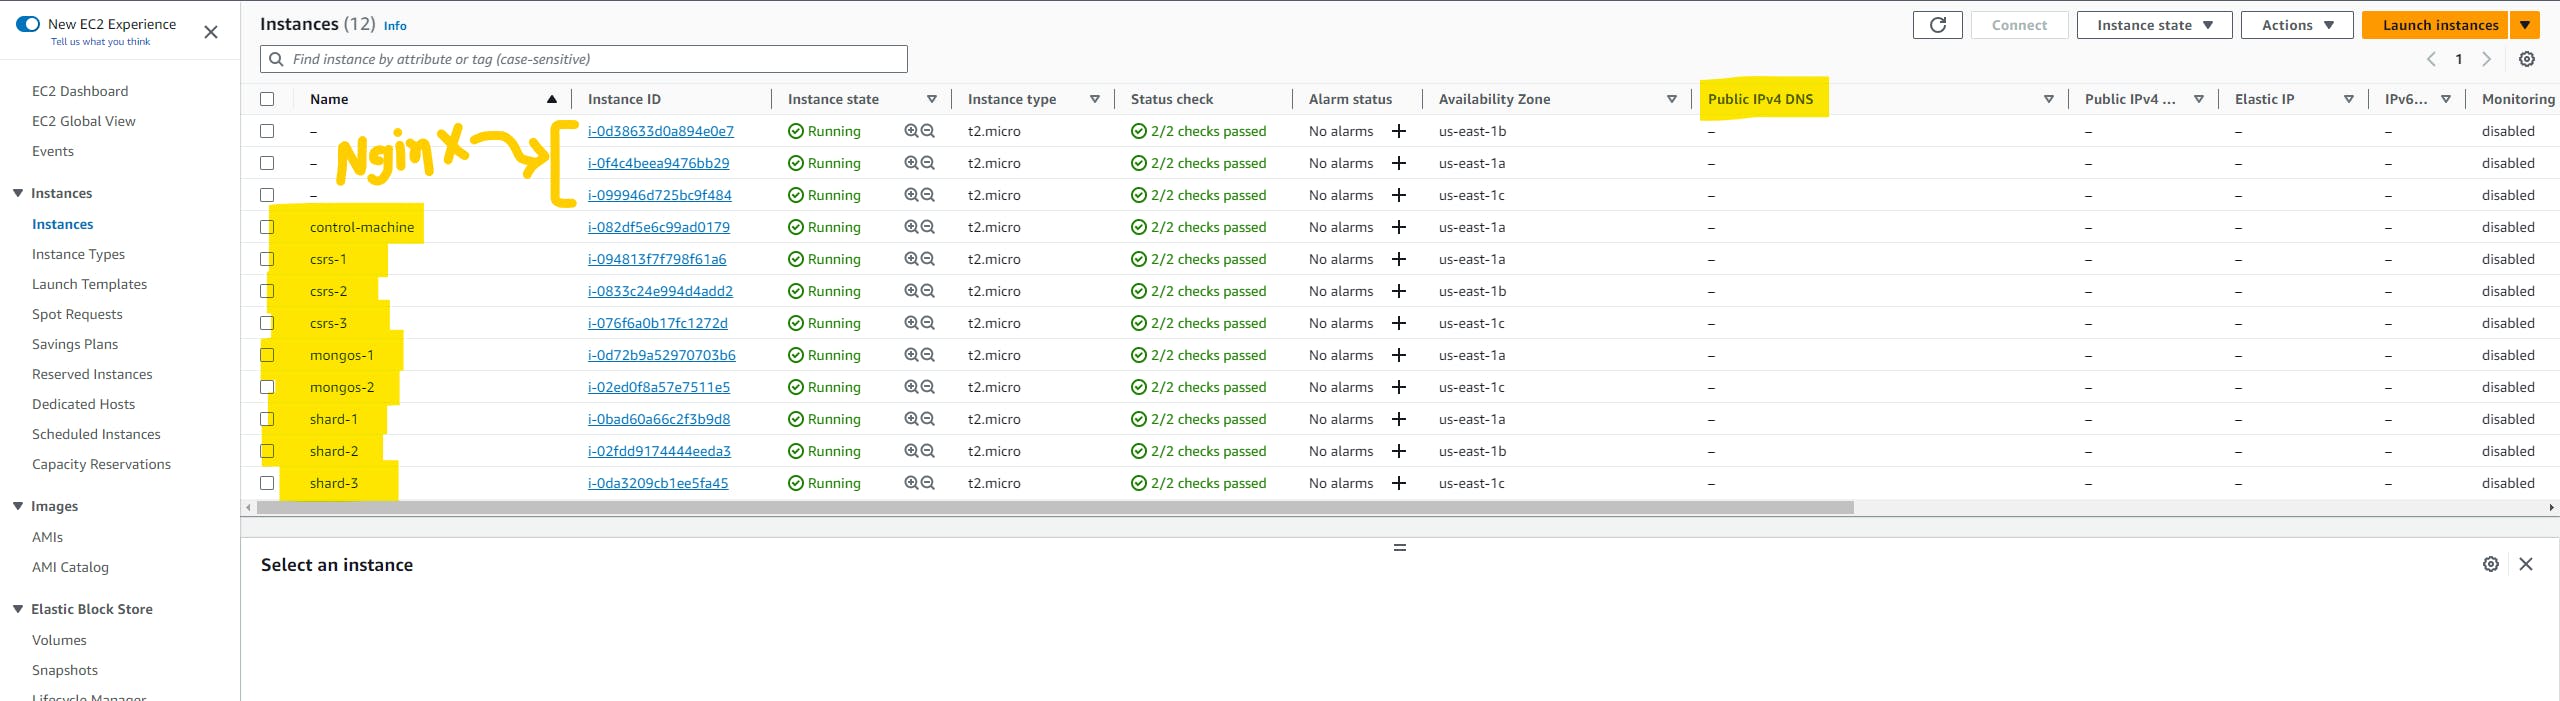
The infrastructure will consist of around 12 EC2 machines: 3 for Nginx, 8 for the MongoDB cluster, 1 for the control machine, 1 application load balancer, and 1 network load balancer.
Prerequisites
Before we begin, make sure you have the following:
AWS Account
Time to invest in learning
basic Linux command
Familiarity with Ansible
Understanding of Terraform
Ansible
Ansible is an open-source tool that enables infrastructure as code and also manages a large number of the computer system. also known as a Configuration Management tool. it is written in Python and it uses the declarative Makrup language.
Ansible is Idempotent in nature so if you apply the same commands multiple times it changes the state only once.
Terraform
Terraform is an IAC tool, it is built and provided by Hashicorp. it uses a simple language called HCL for writing code. it's very easy to use and works with all the major cloud providers.
just like Ansible, Terraform is also Idempotent in nature and it can manage its state file locally or on remote storage.
MongoDB
MongoDB is a popular No-SQL database. It uses JSON-like documents. MongoDB is compatible with almost every programming language and backend framework. it is a bit flexible for developers because defining schema is optional in MongoDB.
MongoDB is highly scalable and many companies use it for storing their data and further processing. MongoDB Atlas offers a SAAS solution to run a production-grade DB without worrying about backups, availability, and scalability.
Replication
Replication is the concept of maintaining multiple copies of your data. It is a very IMP concept in MongoDB or any other database system. Why is replication necessary? because can't assume that our server will always be in running time and we won't face any downtime.
Replica set?
Group node which has exact same data are called replica set. it ensures high availability of data. and in the replica set all data is handled(read & write) by the one node called the primary and the remaining nodes sync up with the primary node.
if the primary node goes down, one of the secondary nodes will become primary and start serving the application w/o human interaction. This concept is called failover.
Sharding & Shard?
Its way of distributing data across many nodes is called sharding and each node is known as a shard. and sharding allows us to store our data without worrying about Vertical scaling.
Sharded-cluster?
A Group of shards is called a sharded cluster, We divide the data into pieces and distribute the pieces across as many shards as we want, together shards make up the shared cluster. and to ensure high availability & fault tolerance we deploy each shard as a replica set.
MongoS?
It's a routing process that routes the incoming application request to the specific shard from the sharded cluster. It works as a layer between the application and the shared cluster. and we can add as many as MongoS wants so that we can use the same shared cluster among many applications.
MongoS uses metadata from the Config server to route the request.
Config server?
It's the database that holds metadata about which data is stored on which shard. config server is often accessed by the MongoS and to ensure the high availability of metadata we deploy the config server in the replica set also referred to as config server replica set(CSRS).
Architecture
Let's understand the architecture of today's project. it's essential to understand what we are going to build today. The below diagram tells everything about our project. please have a look at that before jumping to the next section.

Step-by-step guide
Now, it's time to get our hands dirty with hands-on experience. As I mentioned before we are going to utilize the power of Infrastructure as code(IAC) using Terraform and Ansible. and you can access those repositories using the below link.
Terraform code: HERE
Ansible code: HERE
Clone Repo
Please clone the repositories on your local machine and fork on your account. so that we will be on the same page.
In my local machine, I have two repos: one for Terraform code and the other for Ansible code.

let's understand the folder structure so open pwd in VScode.

The Terraform repository contains three folders, each with its purpose indicated by the name. The main folder holds configuration and parameters, while the module folder contains custom modules for infrastructure provisioning.
The Ansible repository contains several folders and files that are self-explanatory from their names. You can configure IP addresses for machines in the group_vars/mongo_cluster and group_vars/nginx_cluster files. Editing these two files will complete the project. The roles folder encompasses all the roles, while the remaining files are standard Ansible configurations.
SSH key-gen
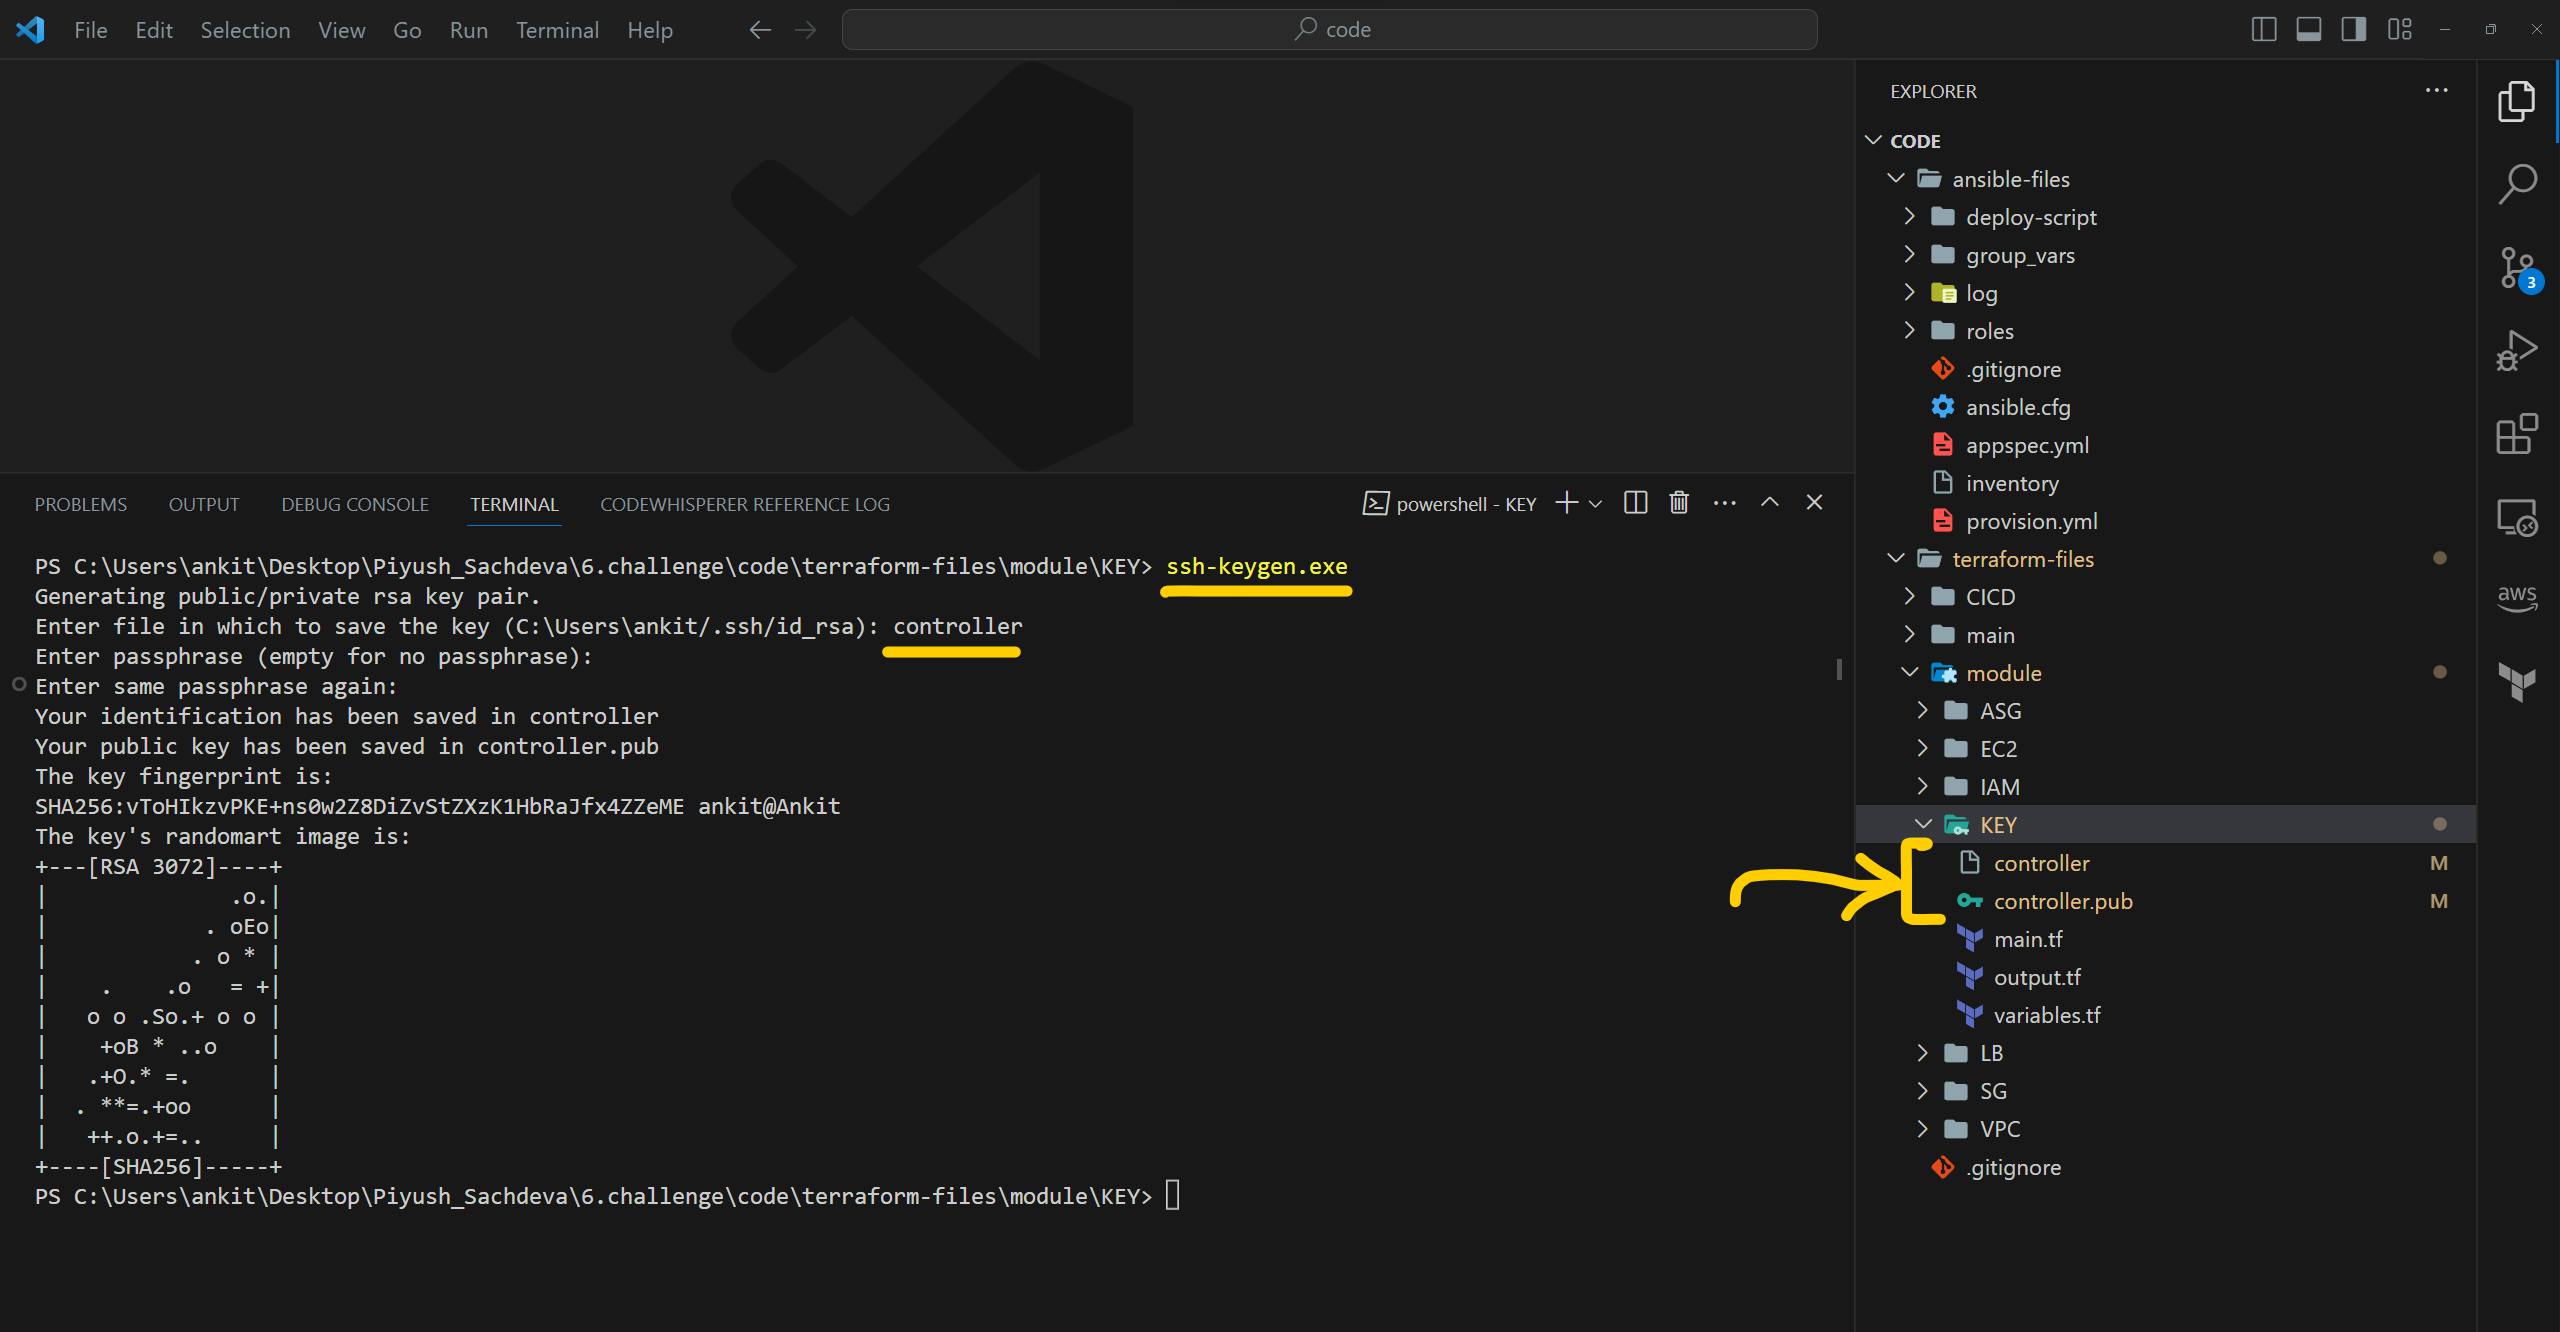
Please go inside the <terraform_repo>/module/KEY folder and open the terminal in that folder. here we need to generate an SSH key which will be used by the control machine to access all other machines.
type command ssh-keygen.exe to generate SSH-Key. it will ask you for a name please give the name controller because that is configured inside the terraform code. and just keep everything as it is and press enter a few times.
After the successful creation of the key, you can see the keys inside /KEY/ the folder.
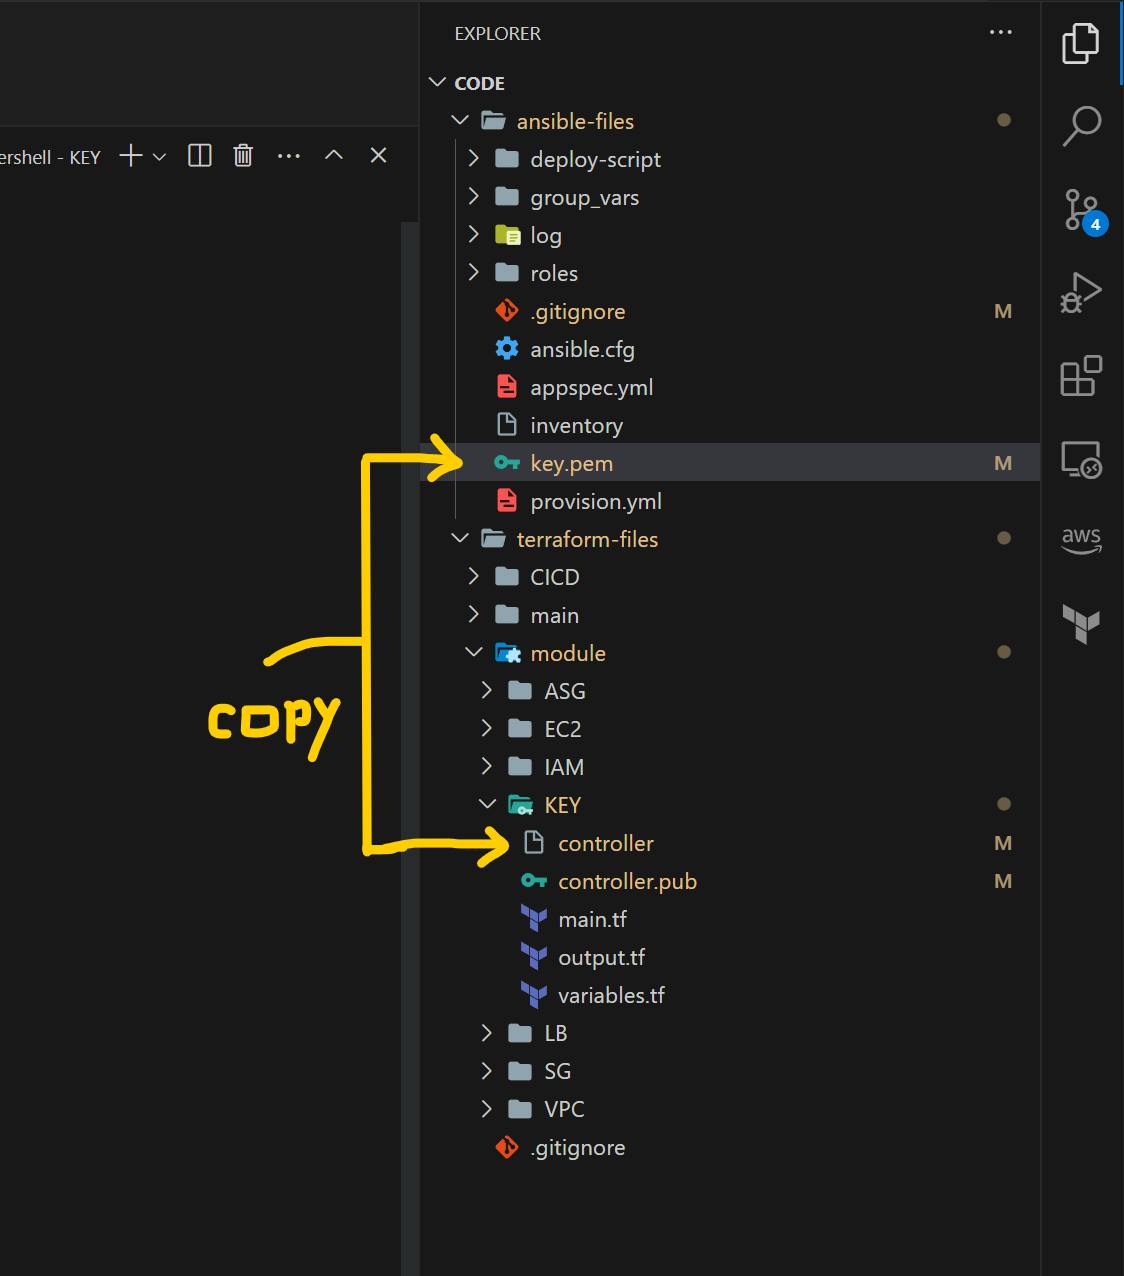
Now let's copy the contoller private key to ansible repo. but make sure you rename it key.pem and paste it into the root directory of the ansible repo.
now last task is to edit the .gitignore file. please remove or comment last lines of the .gitignore file. as shown in the below image because we need a key in the private repo.

CodeCommit
We are going to use AWS CodeCommit. so open the AWS console and head over to AWS CodeCommit services. and create the repository.
Note: Please log in with the IAM user(not root) & user should have access to the code commit.

create two repositories, for Terraform and Ansible.

connect with the repositories and push the code to these repositories which we have just created.

Build project
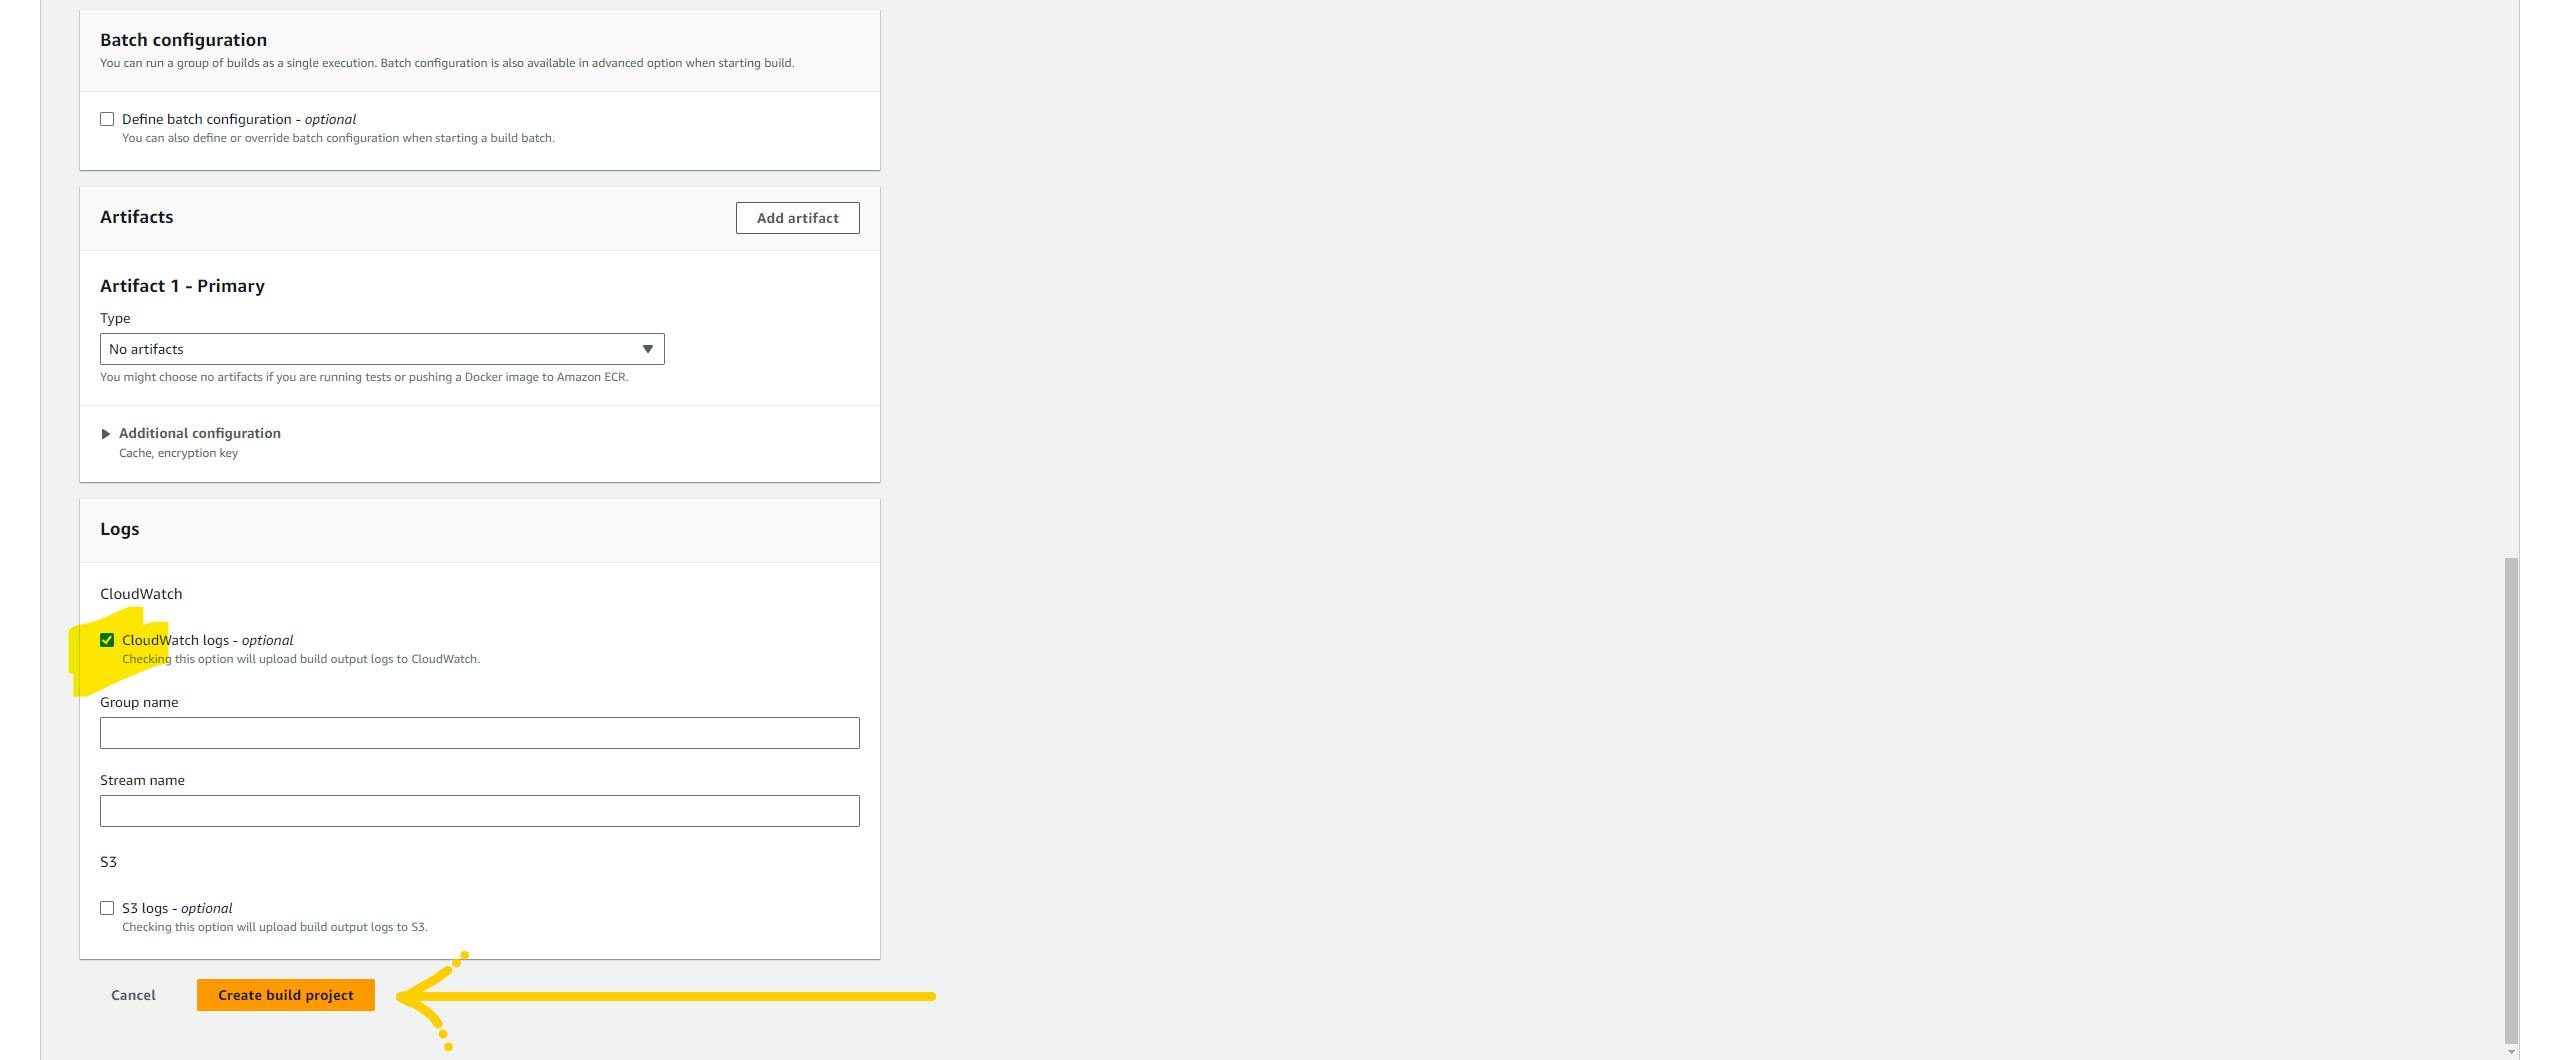
To execute terraform as part of the pipeline we are going to use the AWS code build service. click on create build project.

Hmm, let's configure the project. Give any name and description you wish, In the Sources section, select CodeCommit and select Terraform repo with the main branch.

Now, we need to select the run time for executing our code. I'm selecting Amazon Linux because I've configured my shell script in that way. and if you are following me exactly with the same code please select all the parameters I've selected. Have a look at the below image.
our buildspec.yml The file is present inside the CICD folder.

Pipeline for Terraform
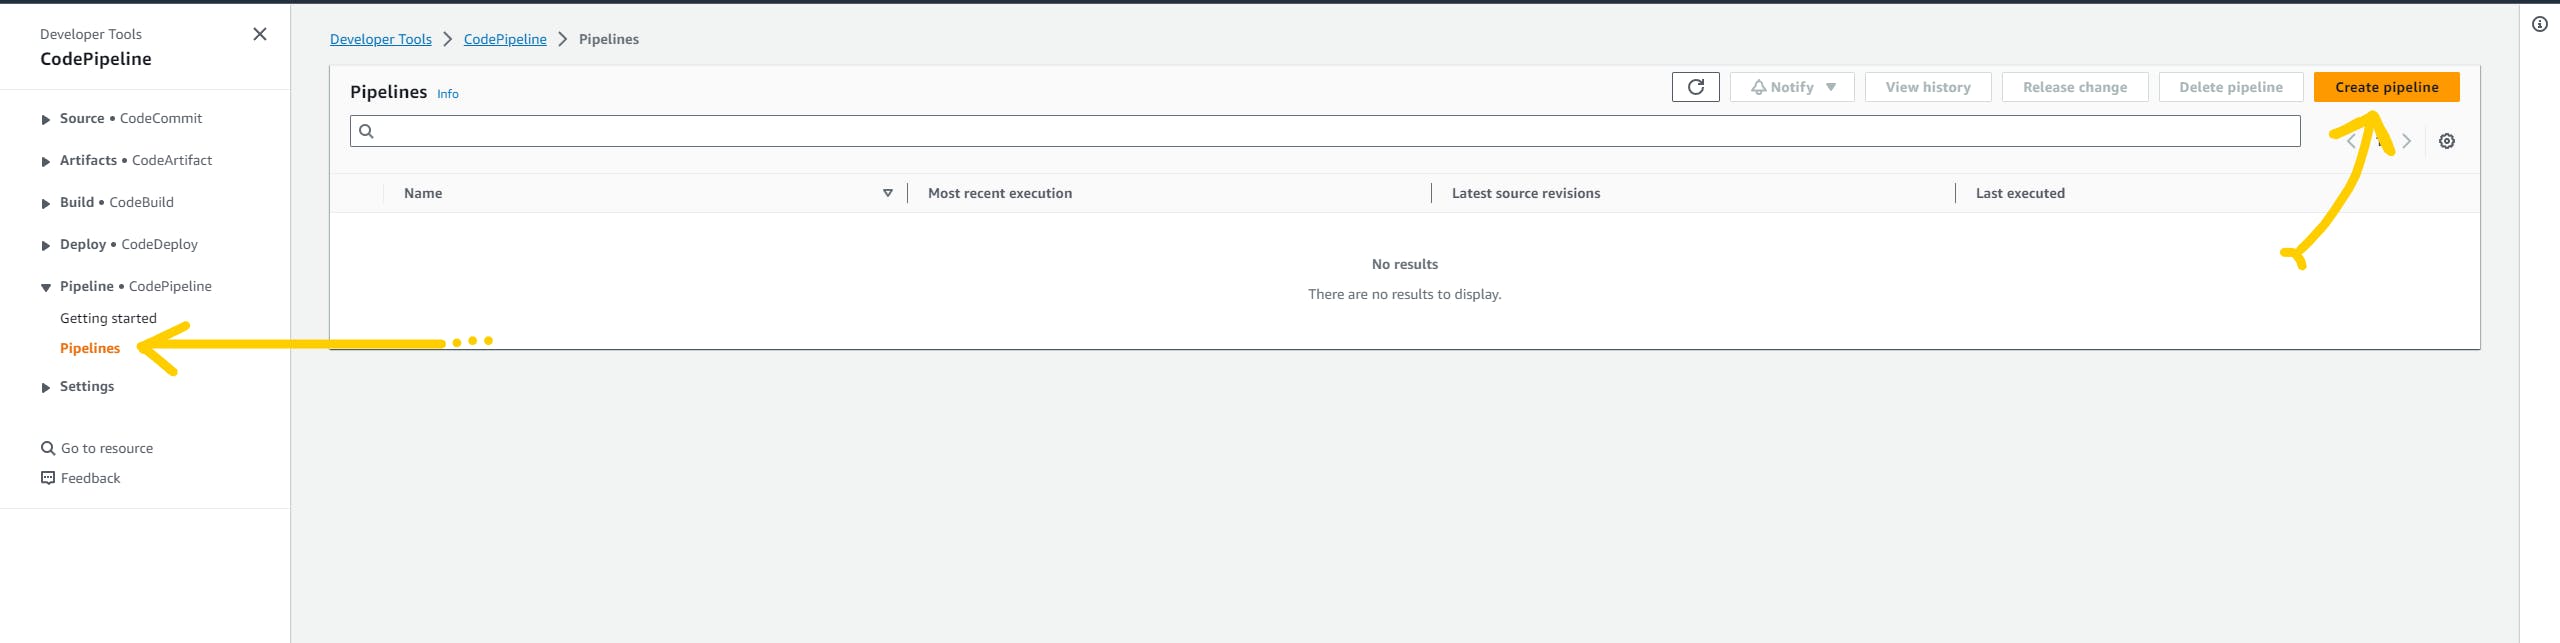
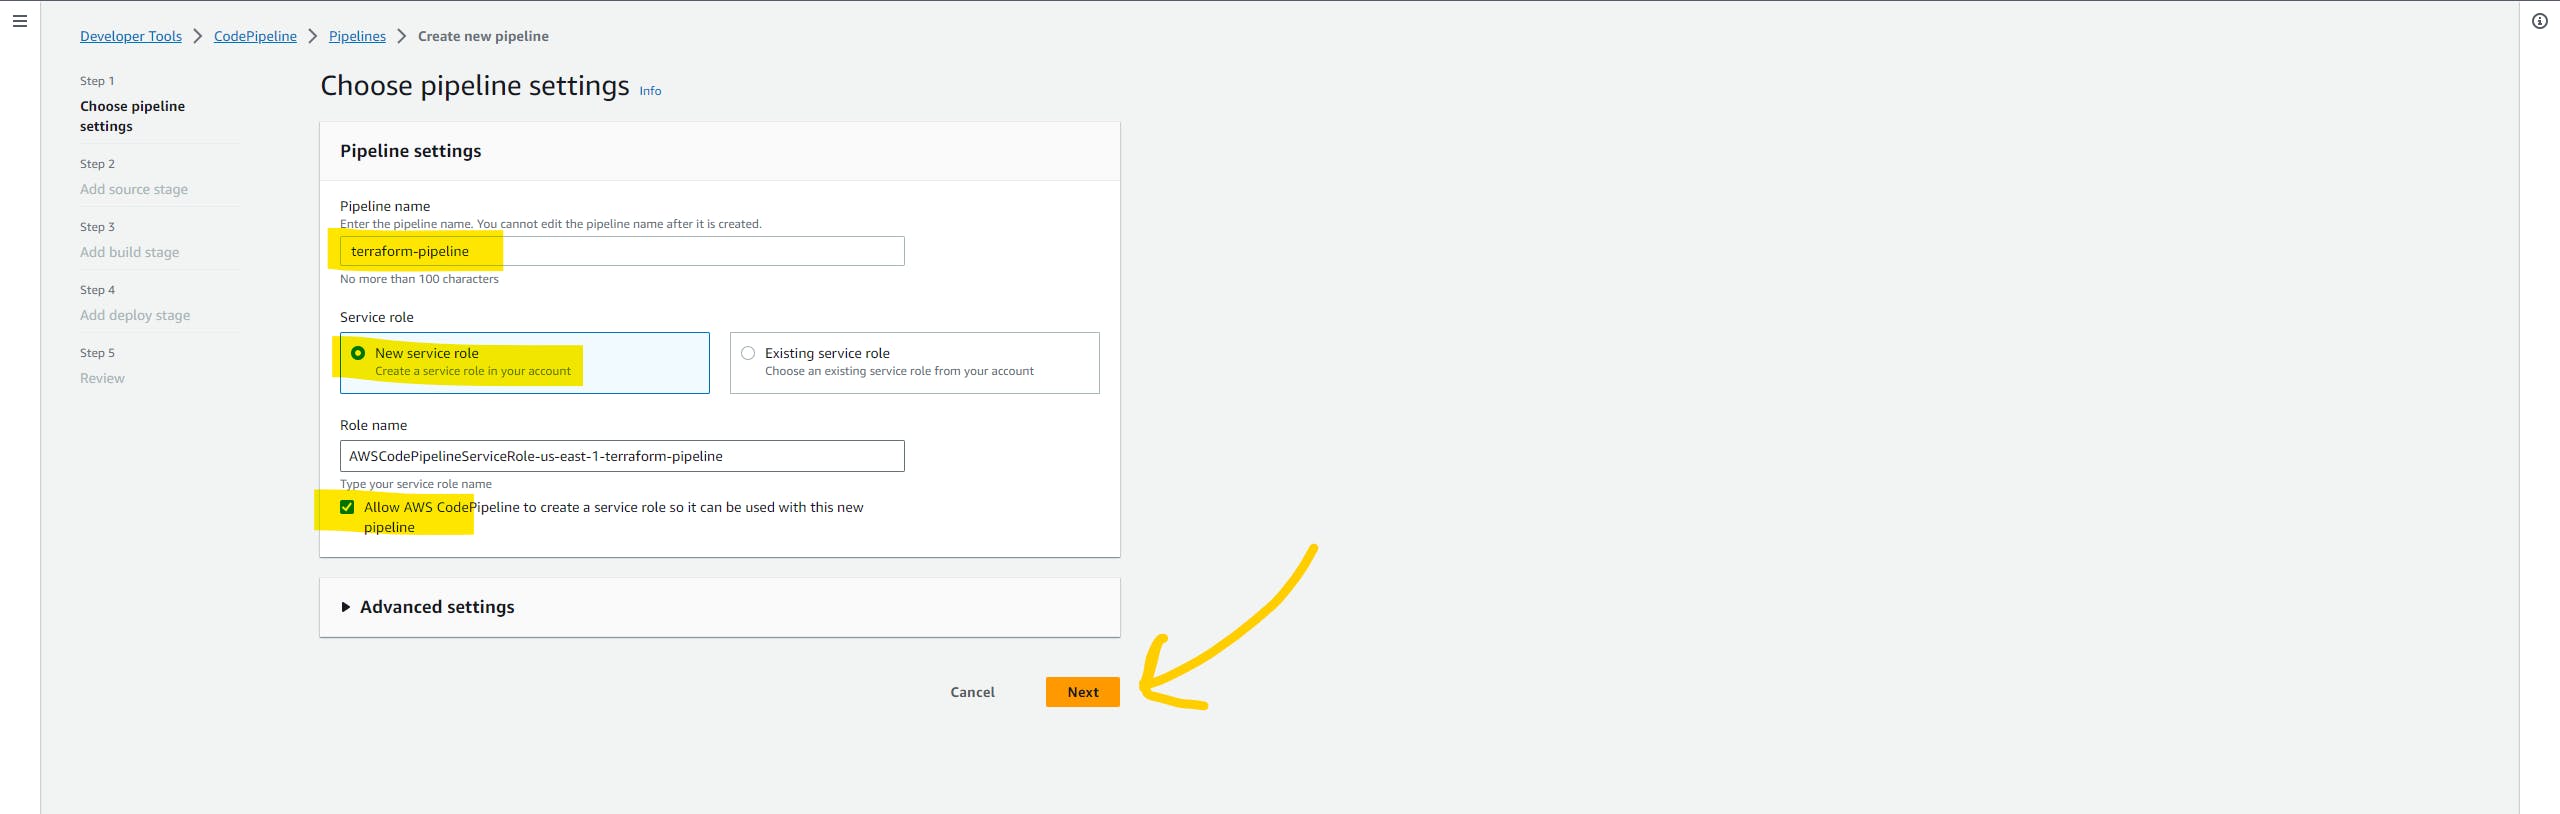
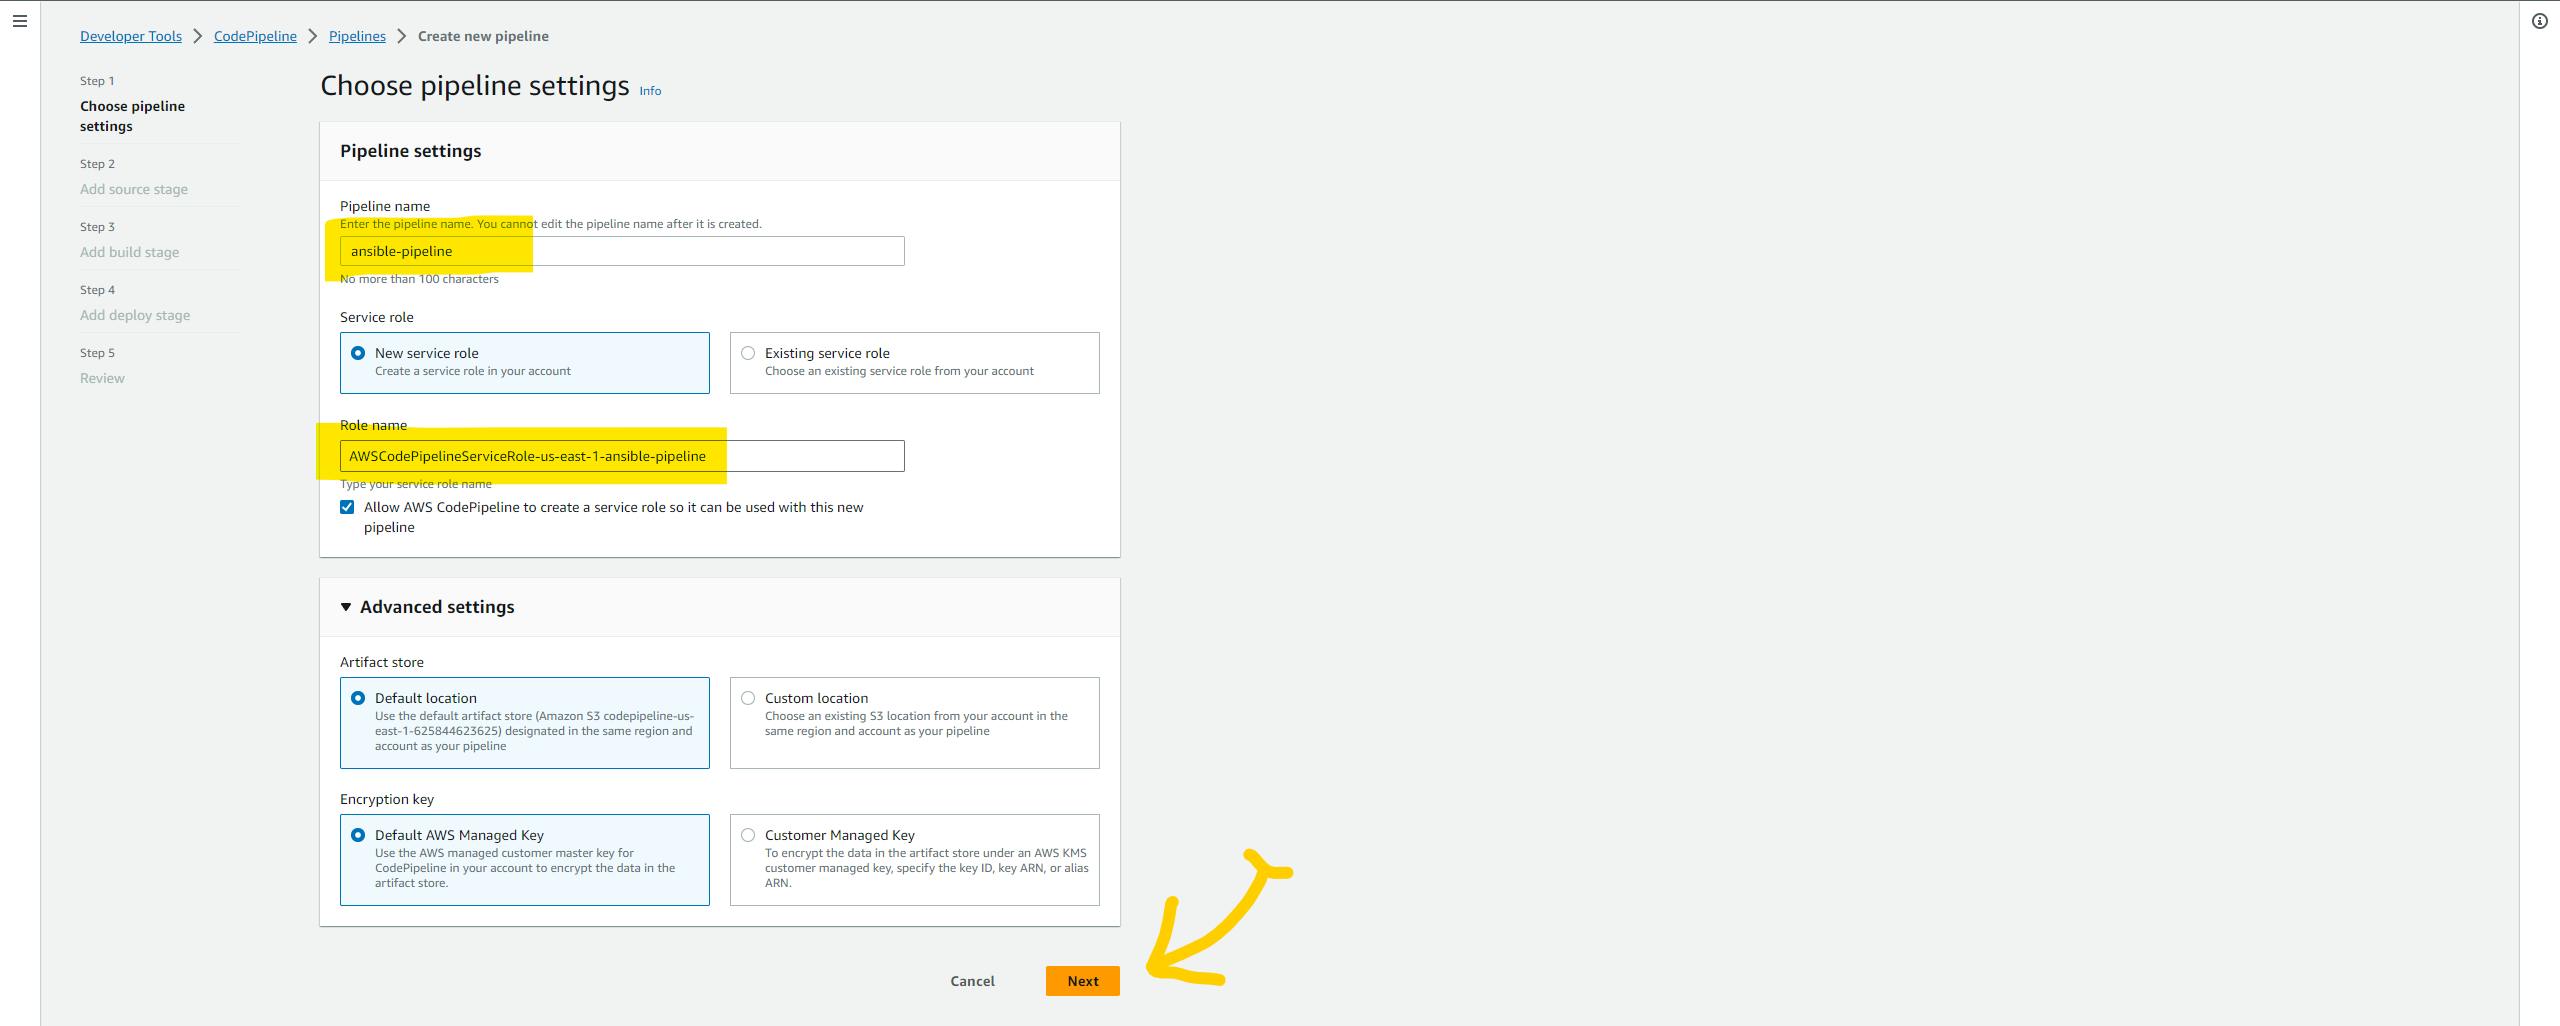
Let's create a pipeline for Terraform. Here we are going to use the AWS Pipeline service. It will trigger the execution when it notices any new changes on CodeCommit. so click on the top right button create pipeline.
Choose the pipeline settings. Give any name to your pipeline. and click on the New Service role option because it will create the role automatically. and click on the Next
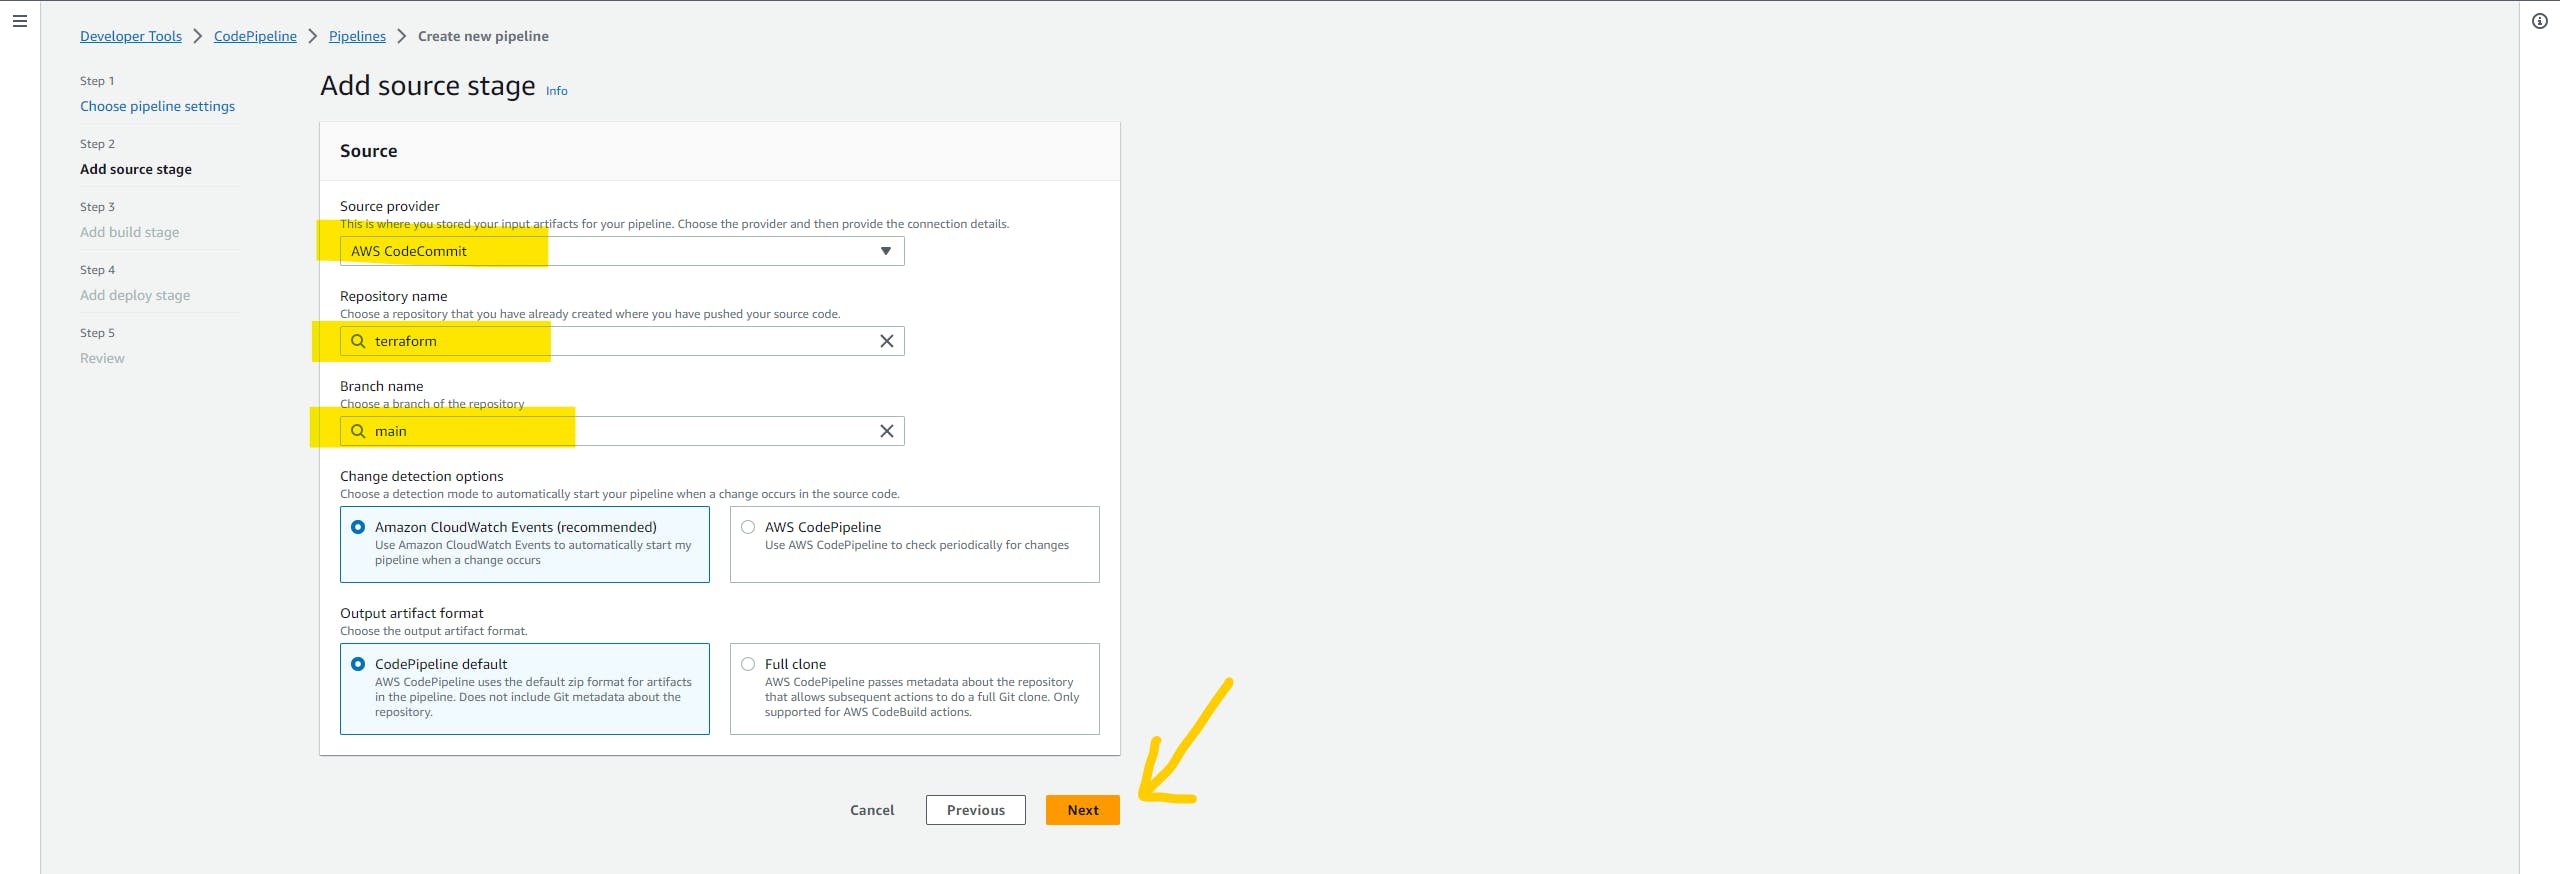
select source code as AWS CodeCommit & select terraform repo with the main branch. and keep the rest of the setting as it is and click on the Next
Here is the most important part, configuring the build stage. Select AWS Codebuild as the build provider & region. In the Project name field select the build that we have just created.
Now we need to set the environment variable. These variables will be utilized by the terraform to create infrastructure in our account. add them as shown in the below image. and click on next button.
AWS_ACCESS_KEY_ID = ENTER_YOUR_ID
AWS_SECRET_ACCESS_KEY = ENTER_YOUR_KEY
PROFILE_NAME = ADD_PROFILE_NAME (must be same as in your terraform file)
AWS_REGION = ADD_YOUR_REGION

We don't need to deploy stage so just skip it. and verify and click on create pipeline

Here we can see the pipeline in a running state. The build stage will download Terraform and configure AWW-CLI using the environment variable that we have passed.
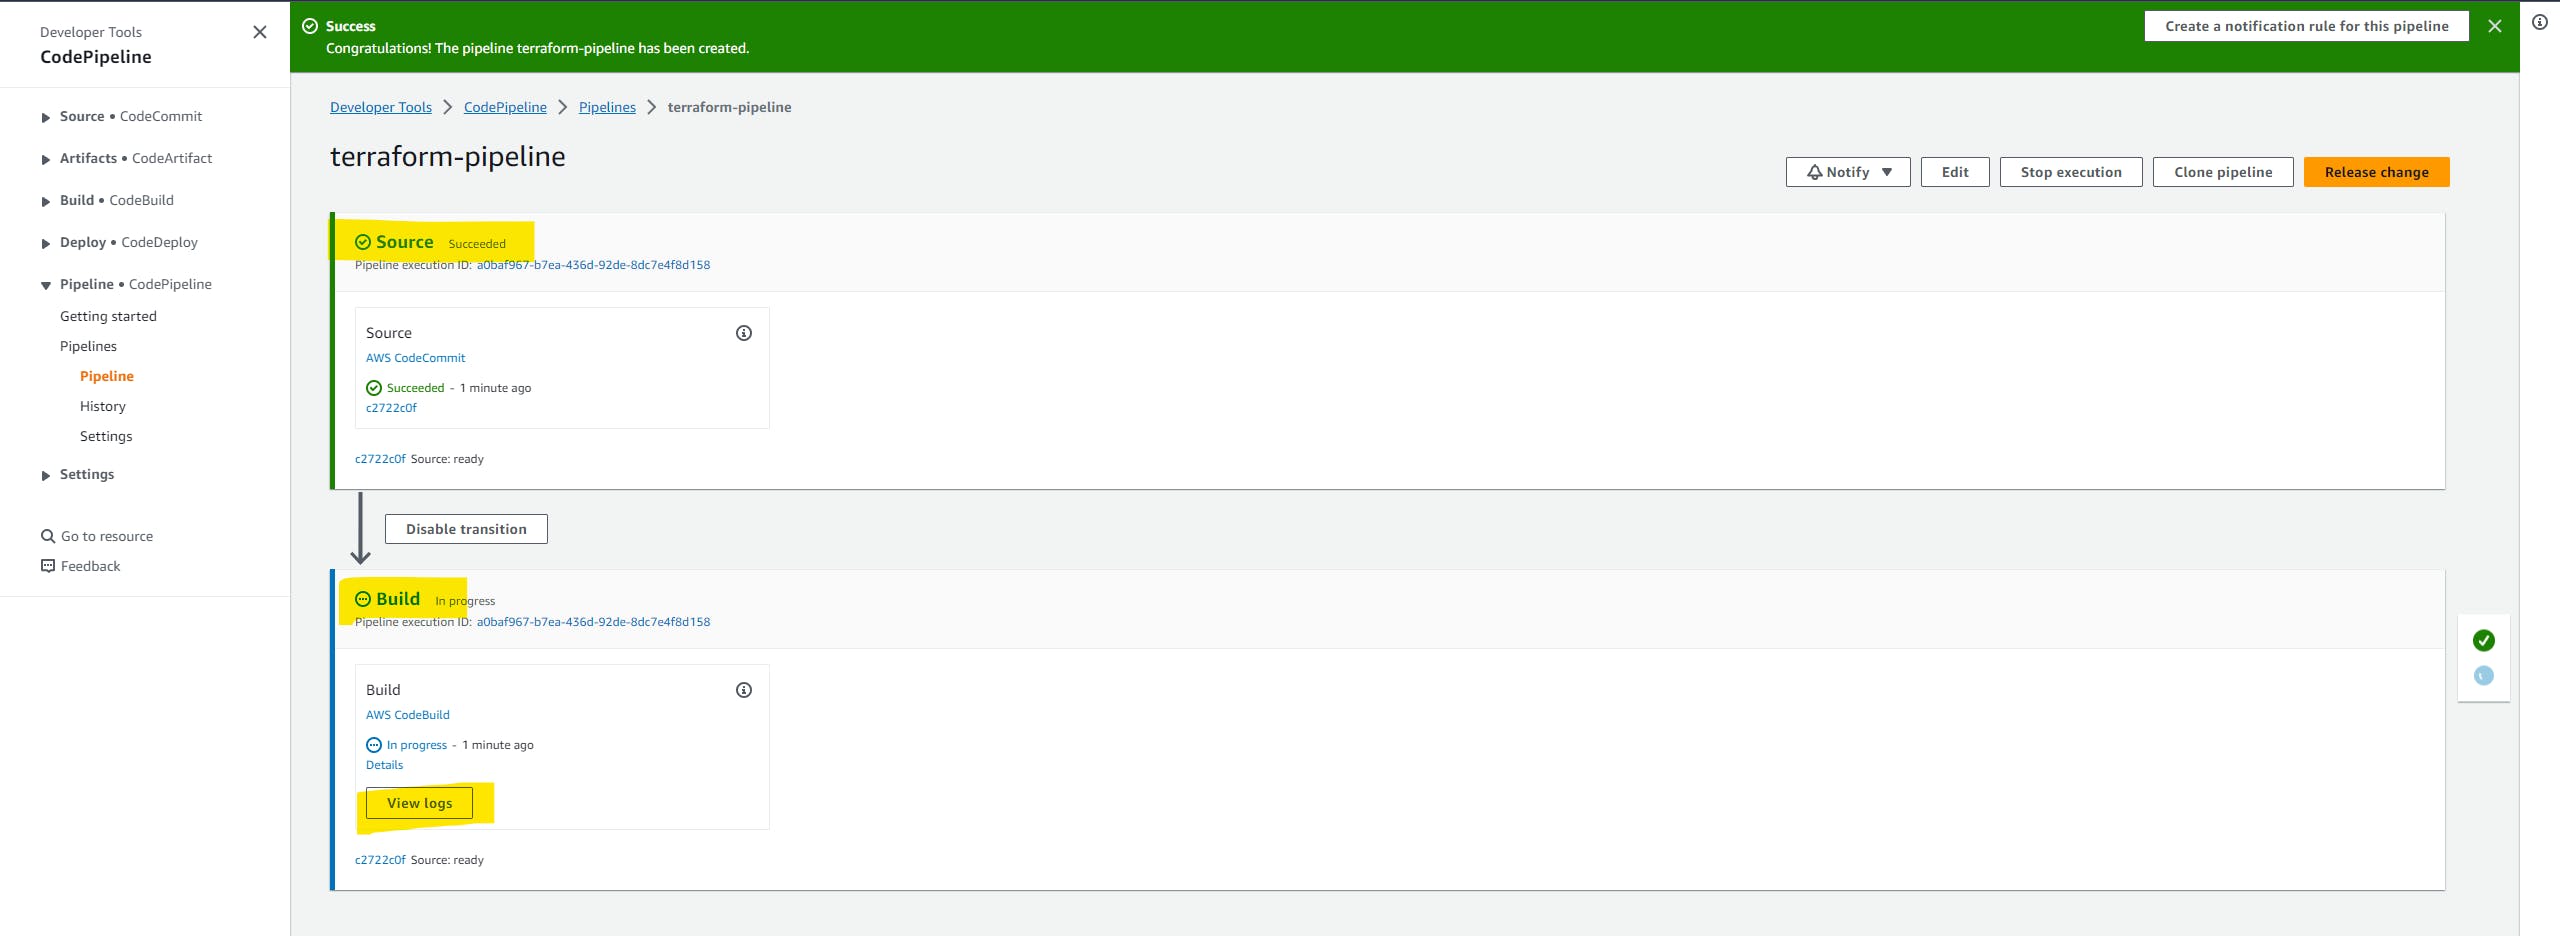
We can access the logs of execution on AWS CloudWatch and here as well. click on the view logs button.


In a short span of time, you will see that our build phase is completed successfully. it means our infrastructure is ready.

Secret Manager
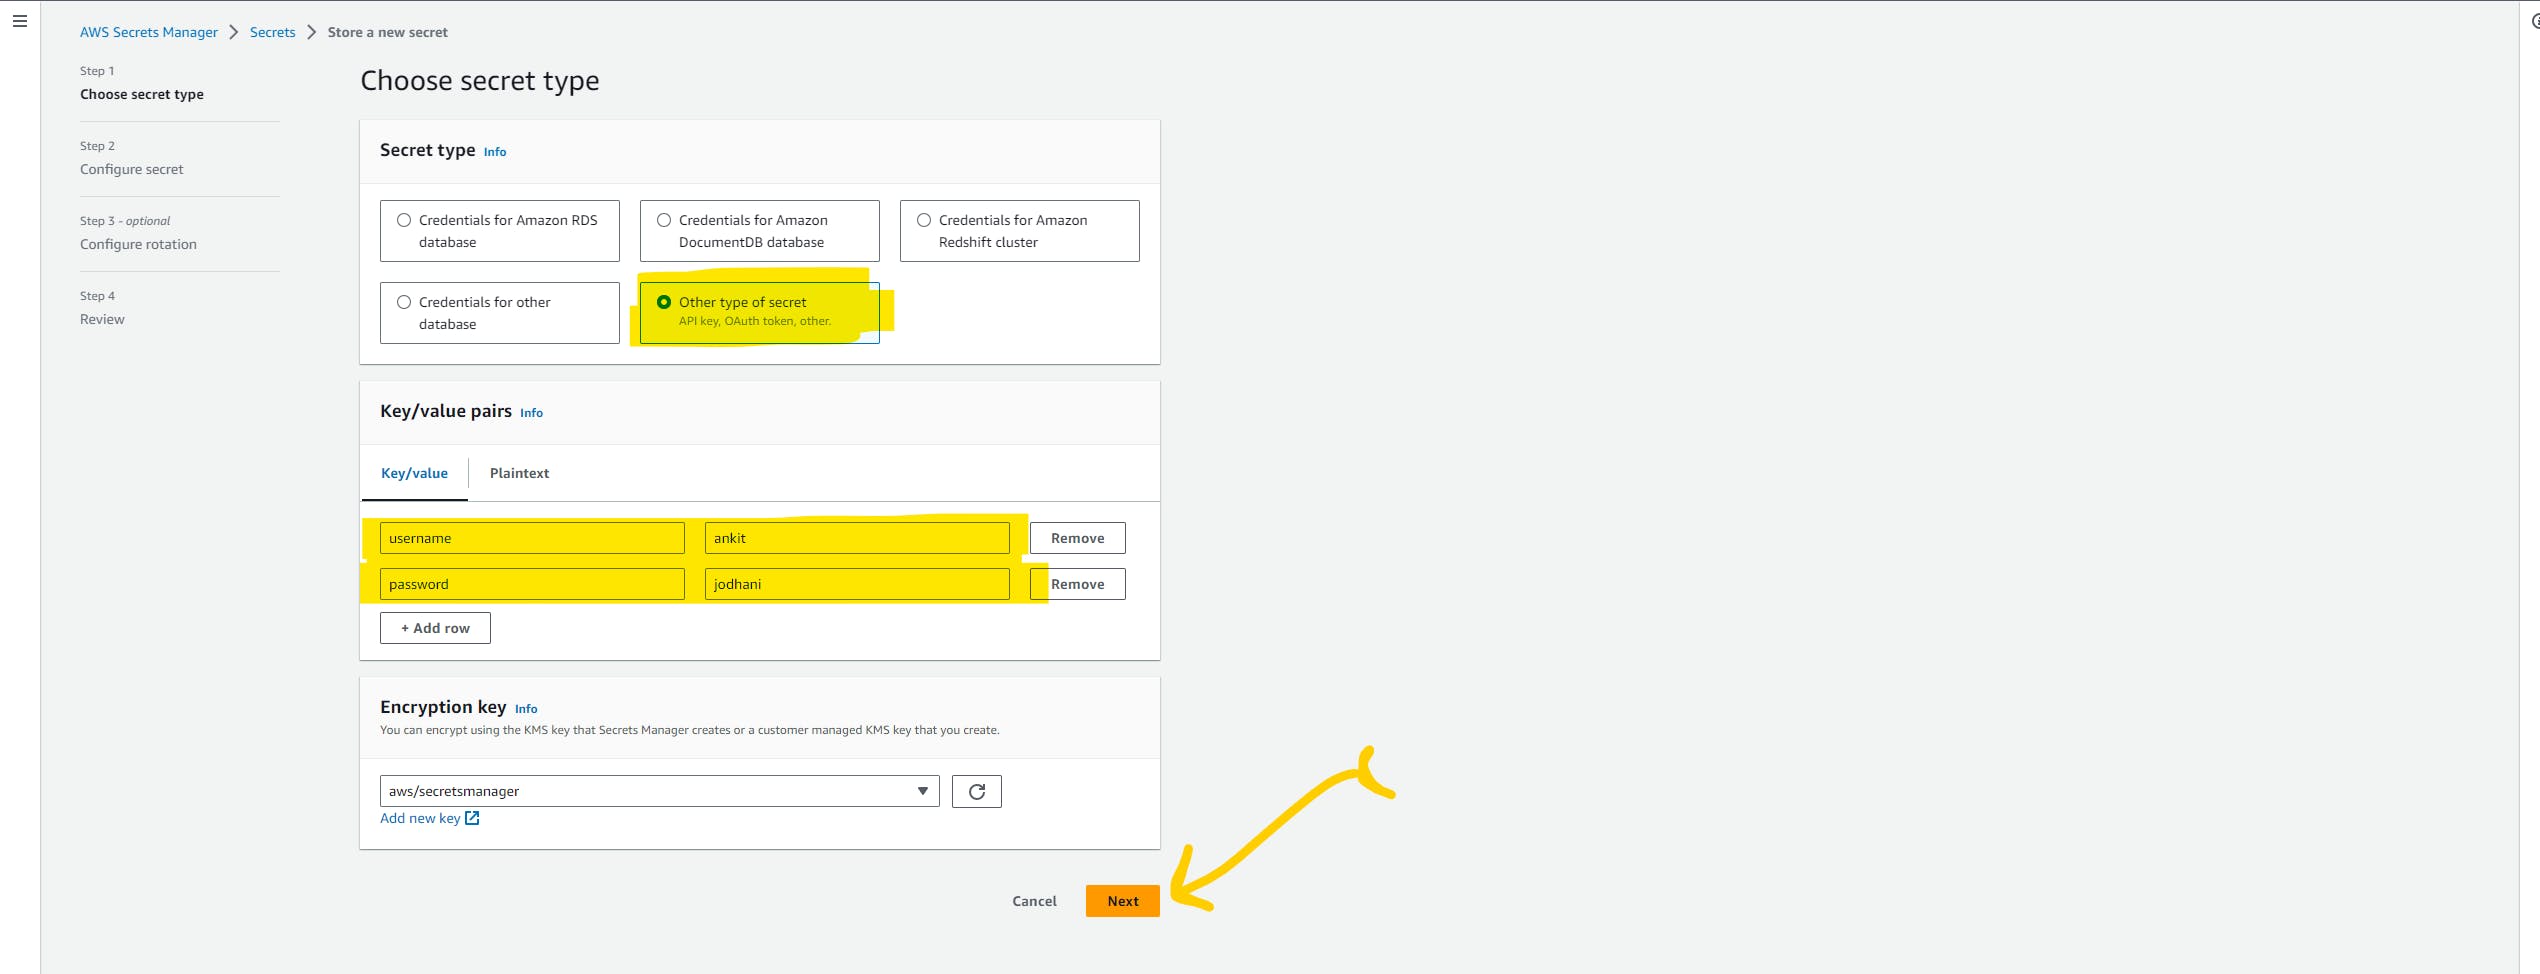
AWS secret manager is aws managed service to store and retrieve secrets through API calls. we are going to use AWS Sec to store the MongoDB username and password because we don't want to hardcode the password in the Ansible playbook.
Alternatively, you can use Ansible Vault to encrypt your credentials.

Let's store the secret as a key-value pair. click on the next
Give any name and description to your secret. and click next-> verify-> next and lastly click on the store secret button.

here is what secrets look like.

Terraform output
Here is the list of resources Terraform created for us.
1 VPC
9 subnet(3 public, 6 private)
5 route table (1 default, 1 public, 3 private)
3 NAT-GW, 1 IGW
12 EC2 machines
1 ALB
1 NLB
Update ansible code
Open any code editor you like in the ansible repo. Here we need to change two files group_vars/mongo_cluster & group_vars/nginx_cluster
Take the IP addresses of instances one by one and update these files. Utilizing Instance Names and Variables for Synchronization and Accurate IP Allocation.

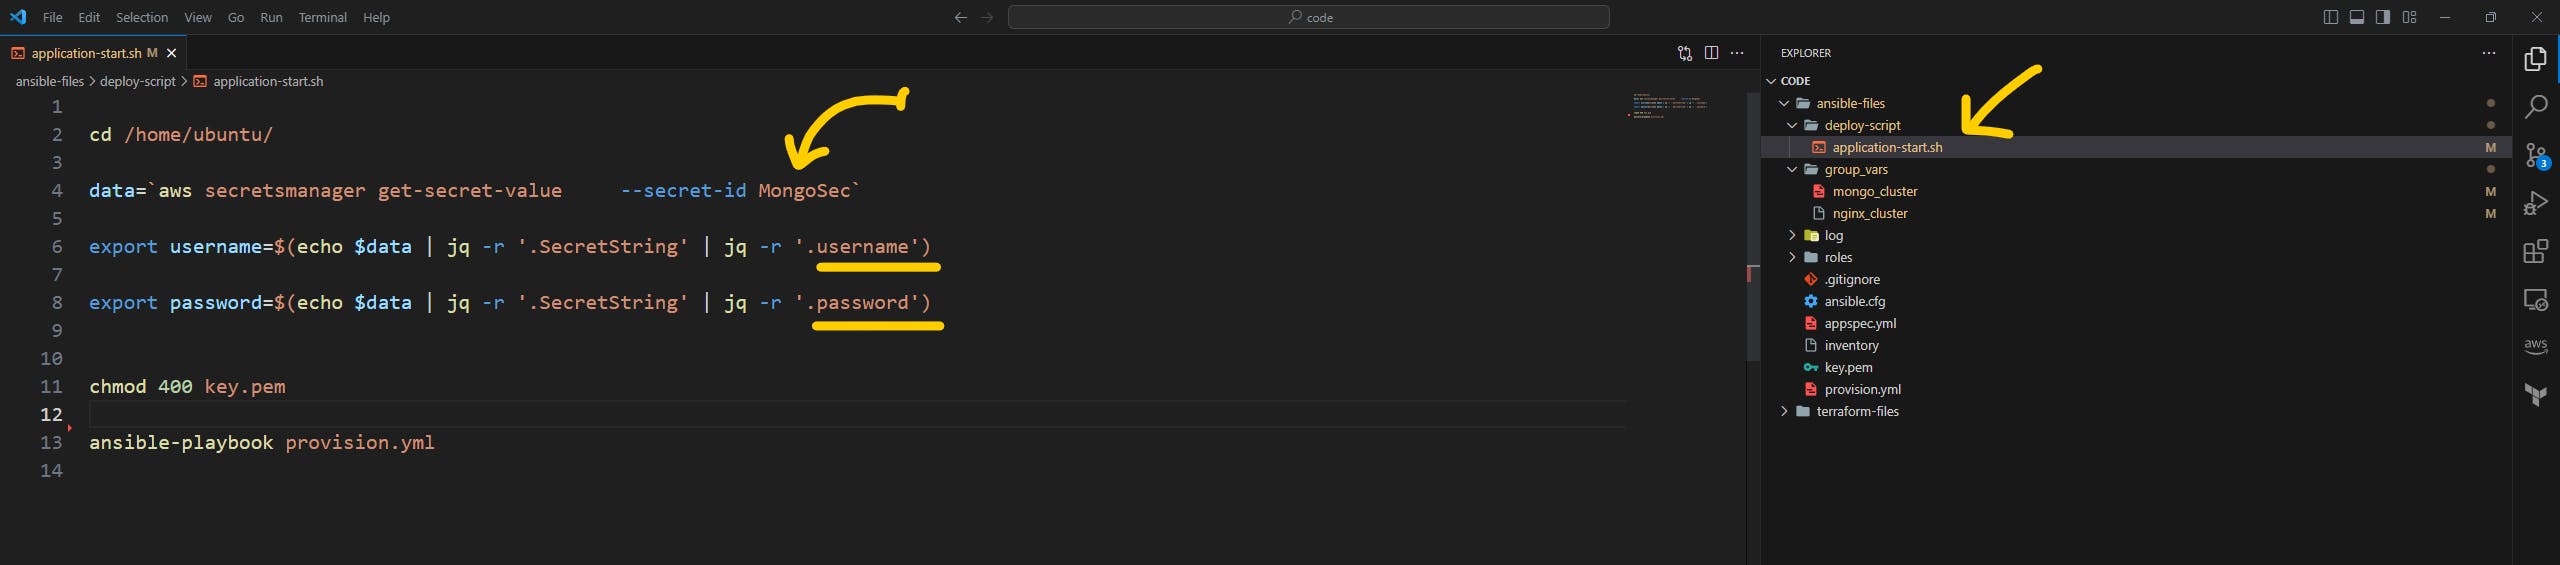
one more file we need to update to ensure a seamless flow of the pipeline and that is deploy-script/application-start.sh file.
Note: You need to change the above file if and only if you have given a different name to your secret manager or a different key pair. if you are following me in the exact same way then you don't have to change anything.
However, it's pretty simple to understand what to update by referring below image.
after updating the parameter push the latest code to the CodeCommit repo.
IAM Role
Many AWS services need permission to access the other services and to give that permission we need an IAM role.
Head over to IAM services. and click on the create role

Select AWS services type CodeDeploy in the search bar and select CodeDeploy. and click on the next

Give any name you want and description. and hit create role button.

Deployment & Application
We want to run the Ansible playbook on the control machine which is already created by the terraform and has all the packages to run Ansible. Additionally, it also contains a CloudWatch agent to collect and send logs to the Cloudwatch service.
but to run the playbook we need something that can access the control machine and provide instructions to ansible what to execute. and to do that we are going to use one of the AWS services called AWS CodeDeopoy.
Head over to the AWS CodeDeopy service and click on the Create Application button.

give the name to your application and select a platform. and hit the next button.

Click on the create deployment group
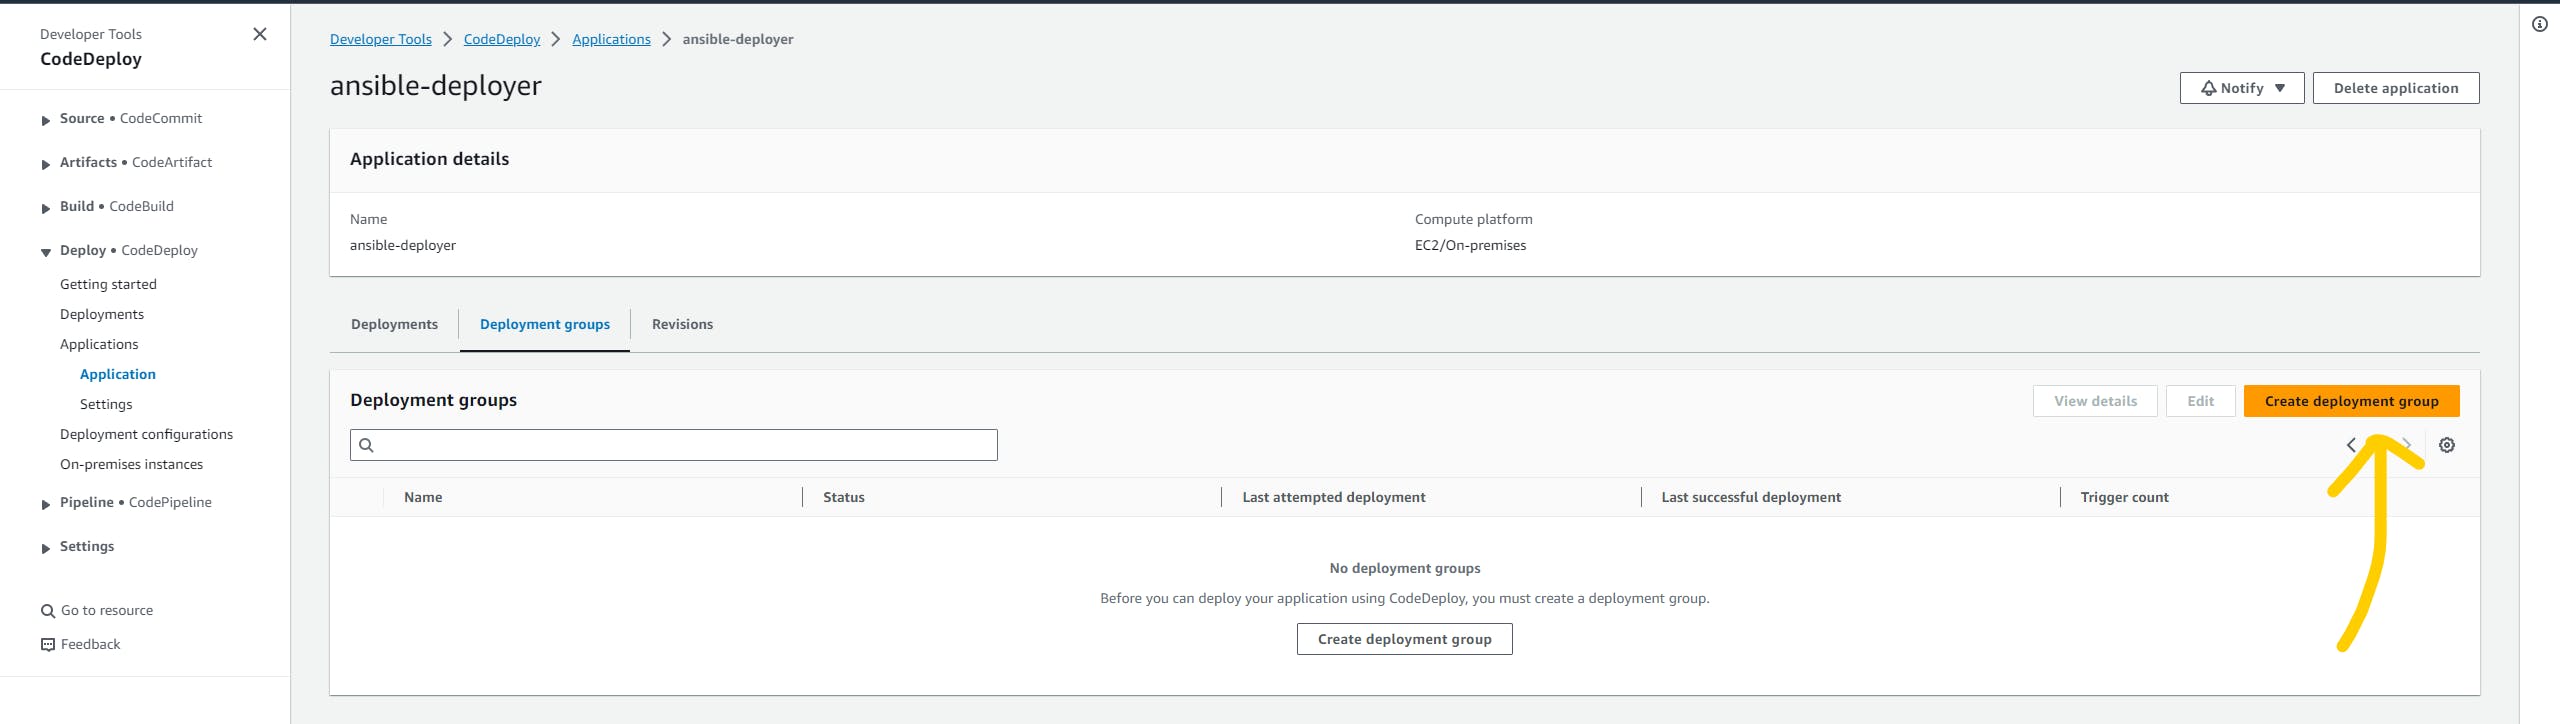
Give a name to your deployment group. and select the IAM role that we have created just now.

Select the rest of the parameters as I've shown in the below image.

Make sure you add the proper tags in the environment configuration because through tags deployment group will find the control machine. and hit the create the deployment group button.
Pipeline for Ansible
It's time to create a pipeline for Ansible. click on the Create pipeline button.

Give a name to your pipeline and click next.
Select the source as AWS CodeCommit and select the ansible repo with the main branch.

Here we don't need a build stage so just skip it.
On the deploy stage select AWS CodeDeploy as the deploy provider, select the application that we have created, and select the deployment group. hit next button.

We can see the pipeline in a running state. It will take time because the control machine configures all 11 EC2 machines and configures the nginx and MongoDB clusters.
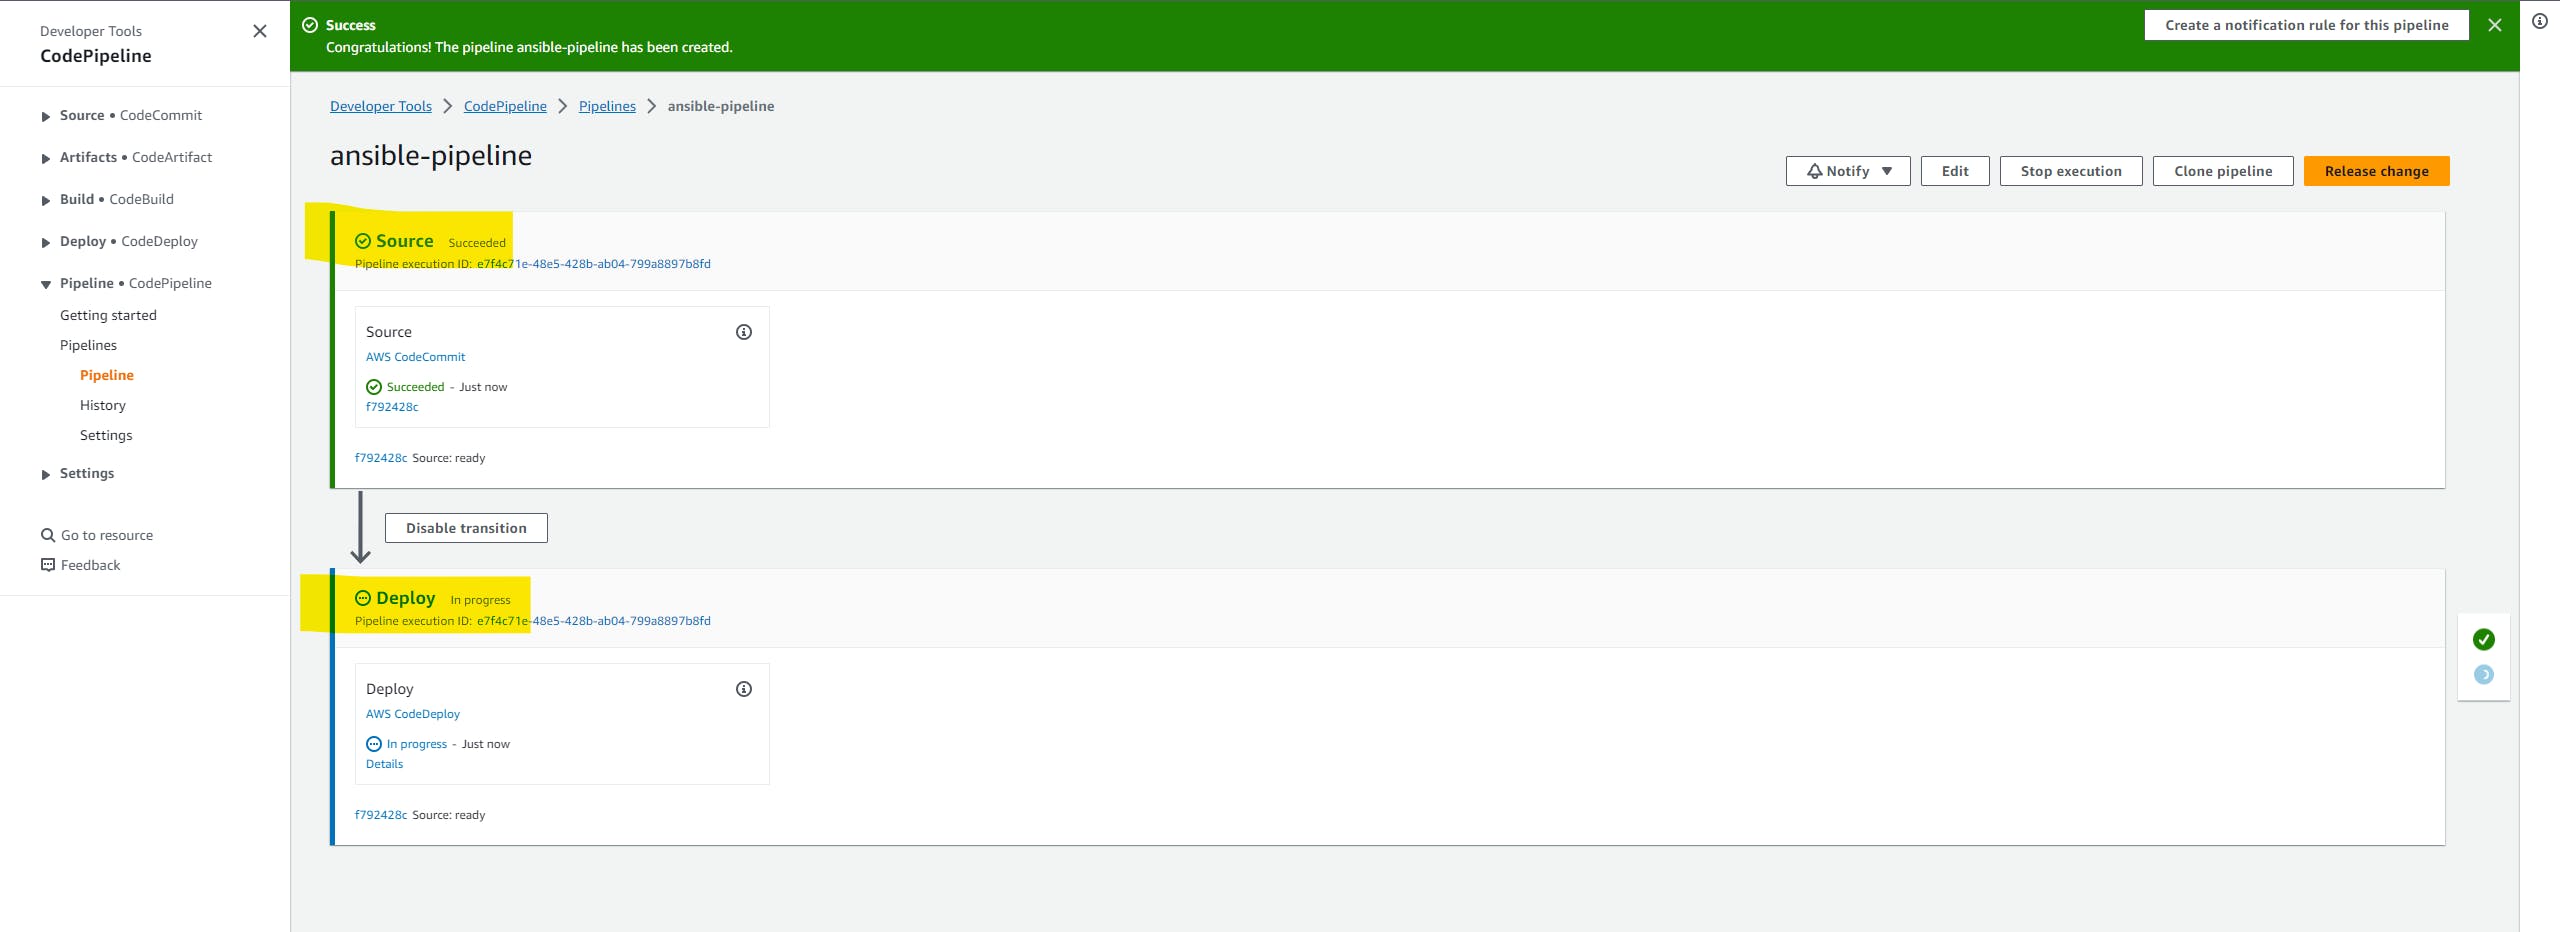
but meanwhile, we can see all the logs and what's going on in the control machine in AWS CloudWatch.

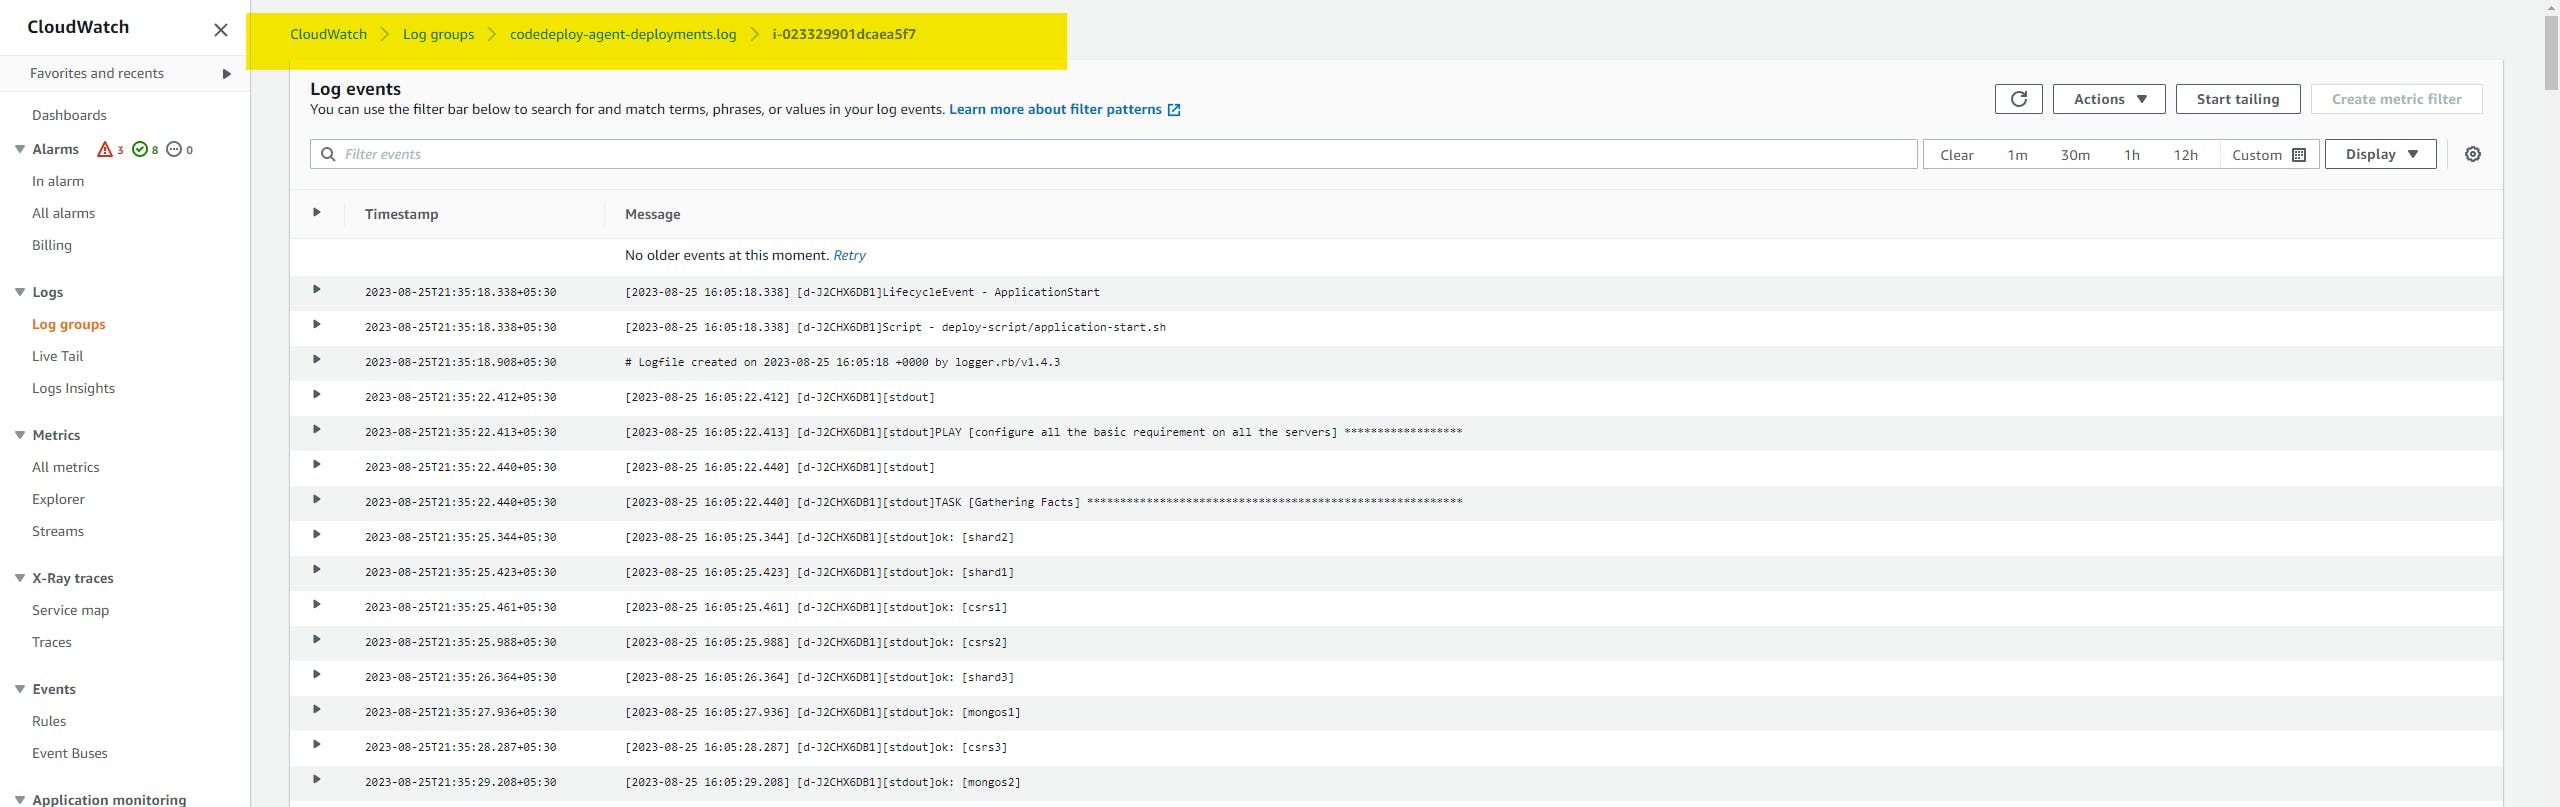
after successful execution, you will see the logs like this.
If it fails then try to release the pipeline one more time. it might happen because some services might not be started when Ansible runs the command

Yupp!! here we successfully provisioned and configured the Production grade MongoDB cluster on AWS.
Testing
Let's check, Is Ansible configured servers as we expected?
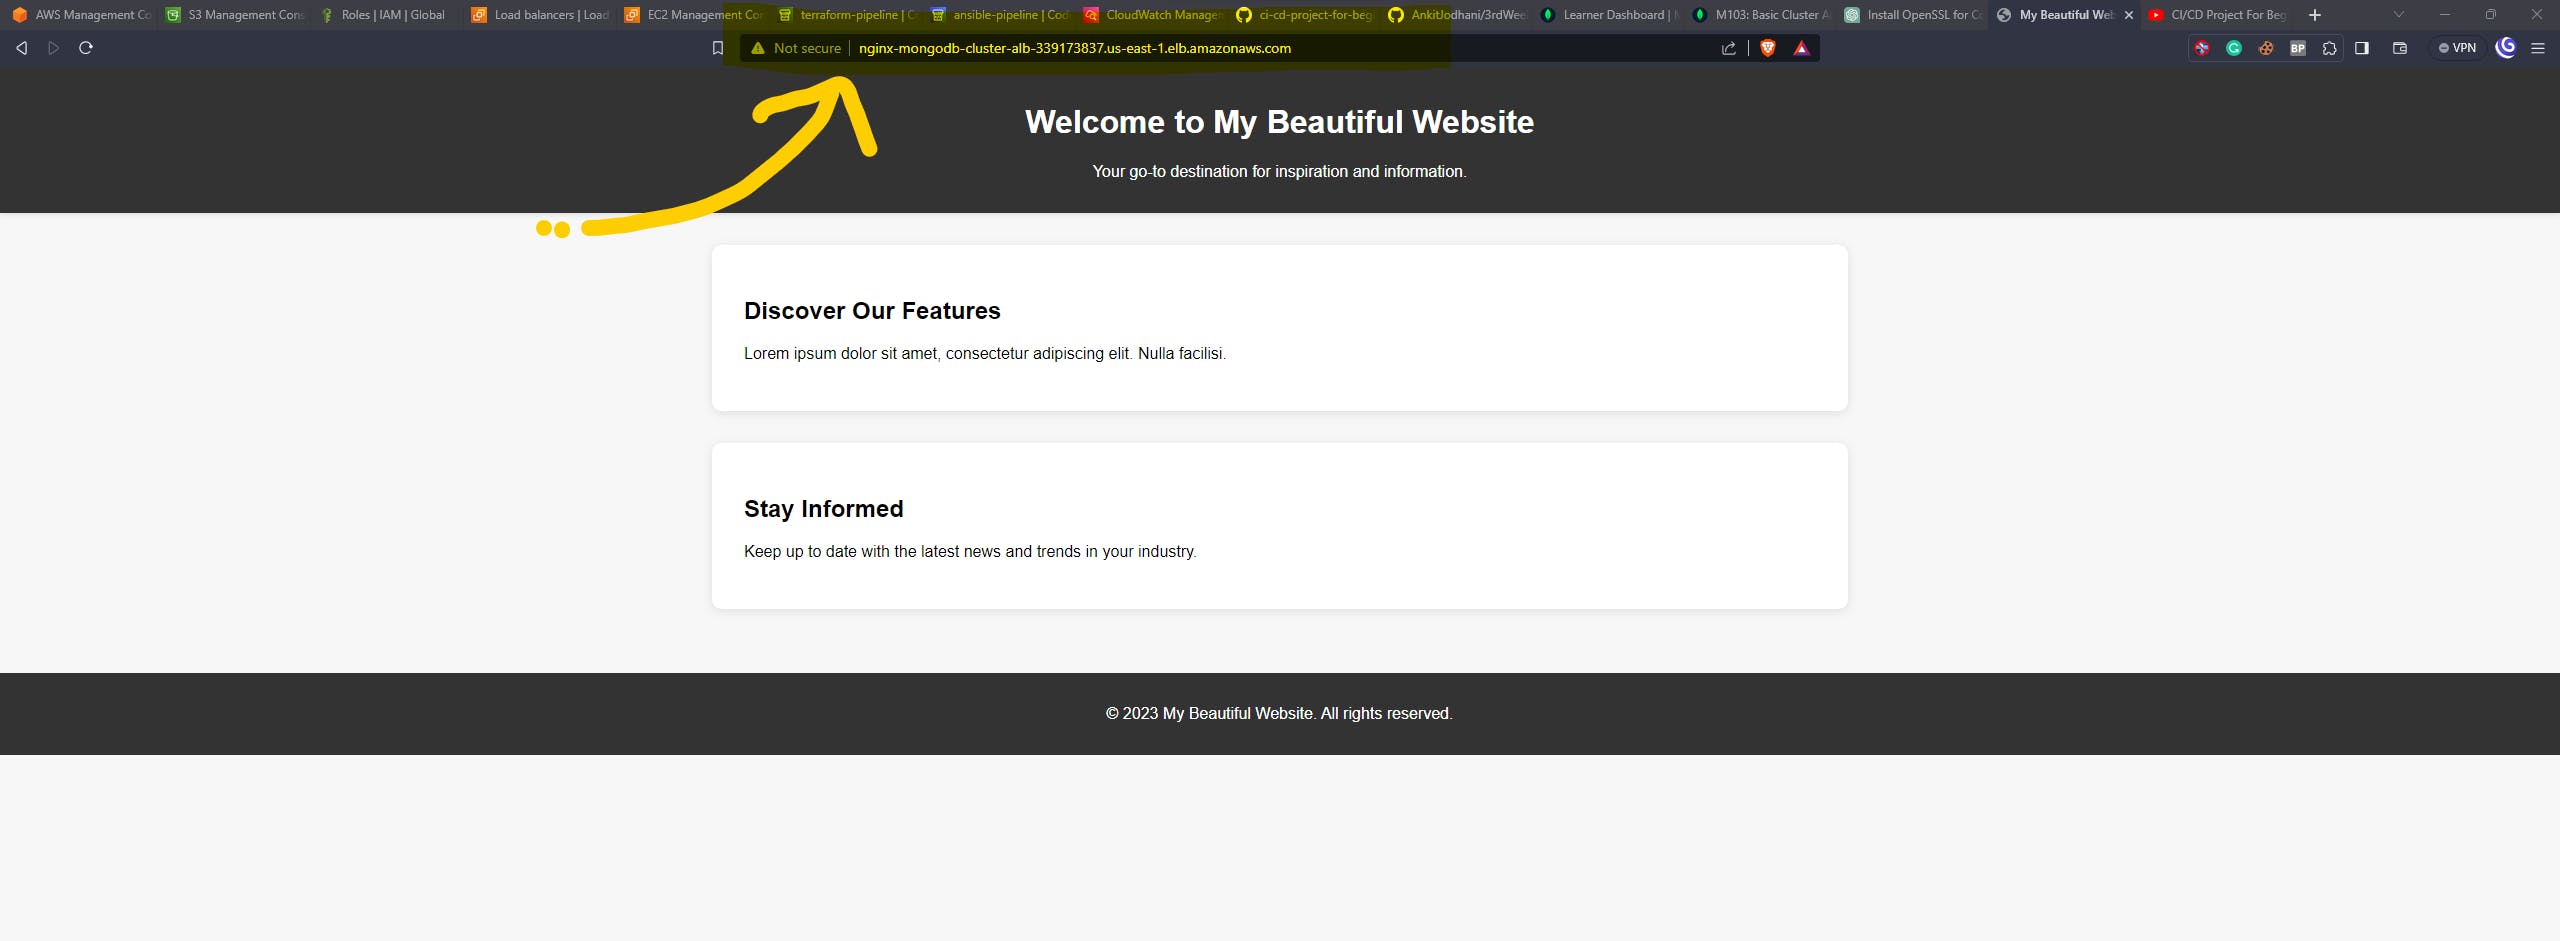
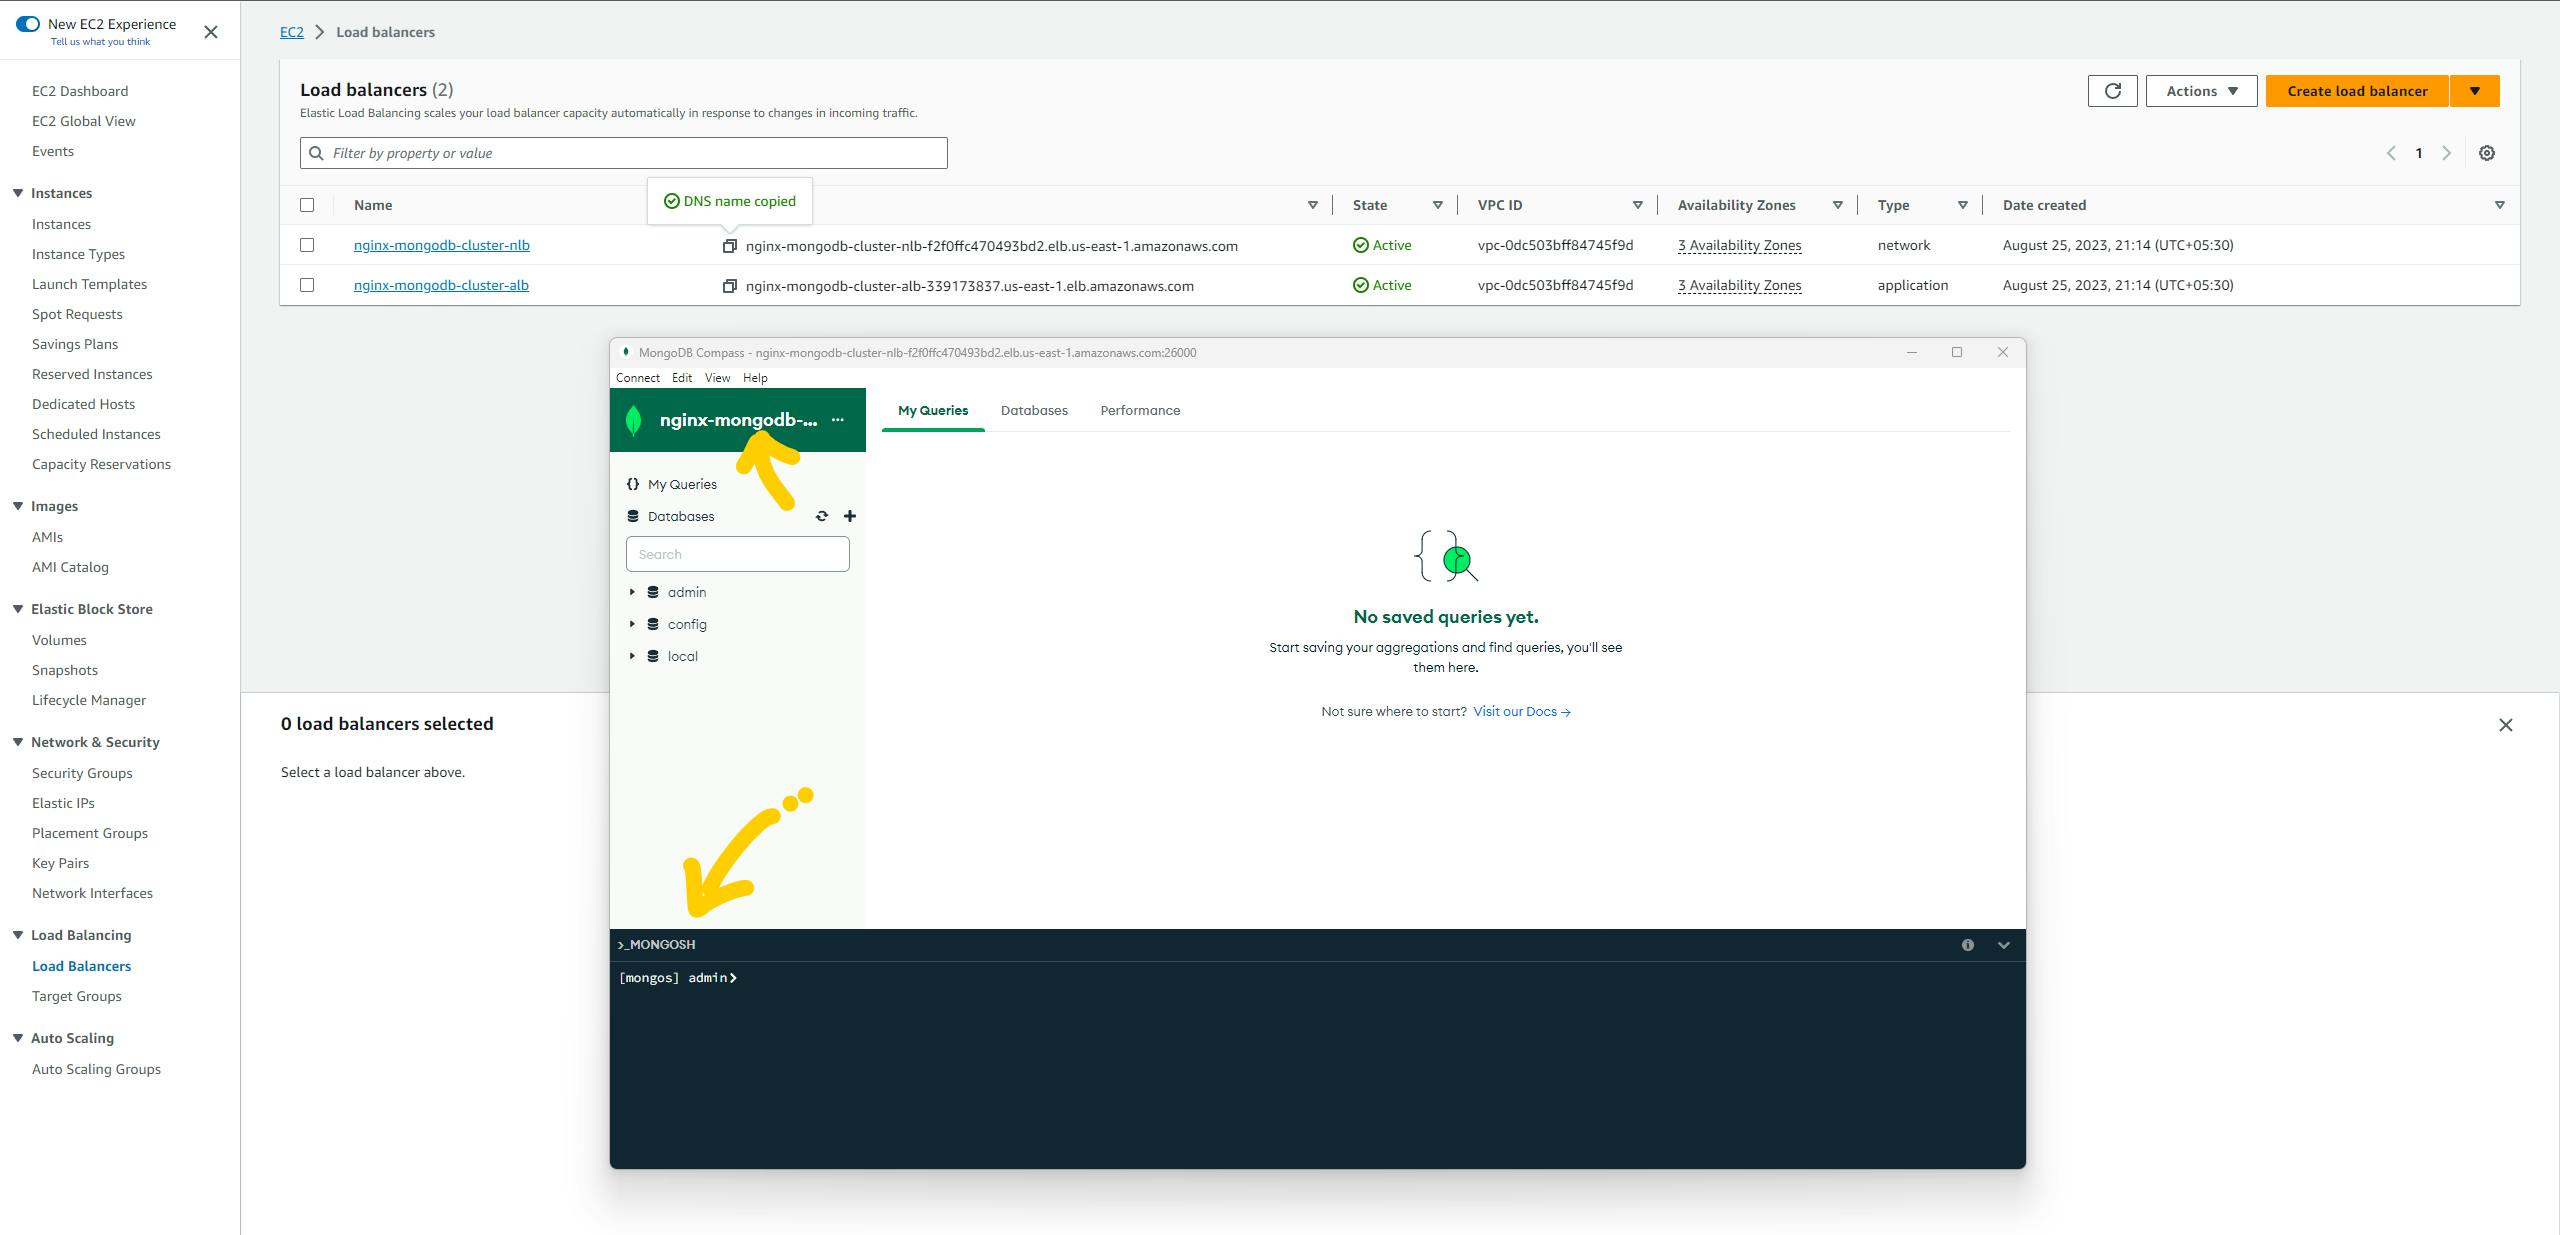
Head over to the EC2 services and open the load balancer dashboard. here we can see the two load balancers. One is a Network load balancer(NLB) pointing to MongoS and the second one is an Application load balancer(ALB) pointing to the Nginx.

Let's take the DNS name of the ALB and paste it on the browser. yes, it perfectly working in my case.
Now, let's check the MongoDB database.
Take the public DNS of NLB and add username, password, and public DNS in the below connection string.
mongodb://<<YOUR_USERNAME>>:<<YOUR_PASSWORD>>@<<PUBLIC_DNS_OF_NLB>>:26000/admin
open the Mongodb compass(a tool to use db in UI mode) and paste the link in text box and hit connect button

Yeah!! we are inside the database. which is running on 8 EC2 machines.
Let's test, Are all shards connected? How many MangoS are there? Just type the below command in the terminal of the MongoDB compass.
sh.status()
Here, we can see the details of all the shards that are connected & how many MongoS are there connected.

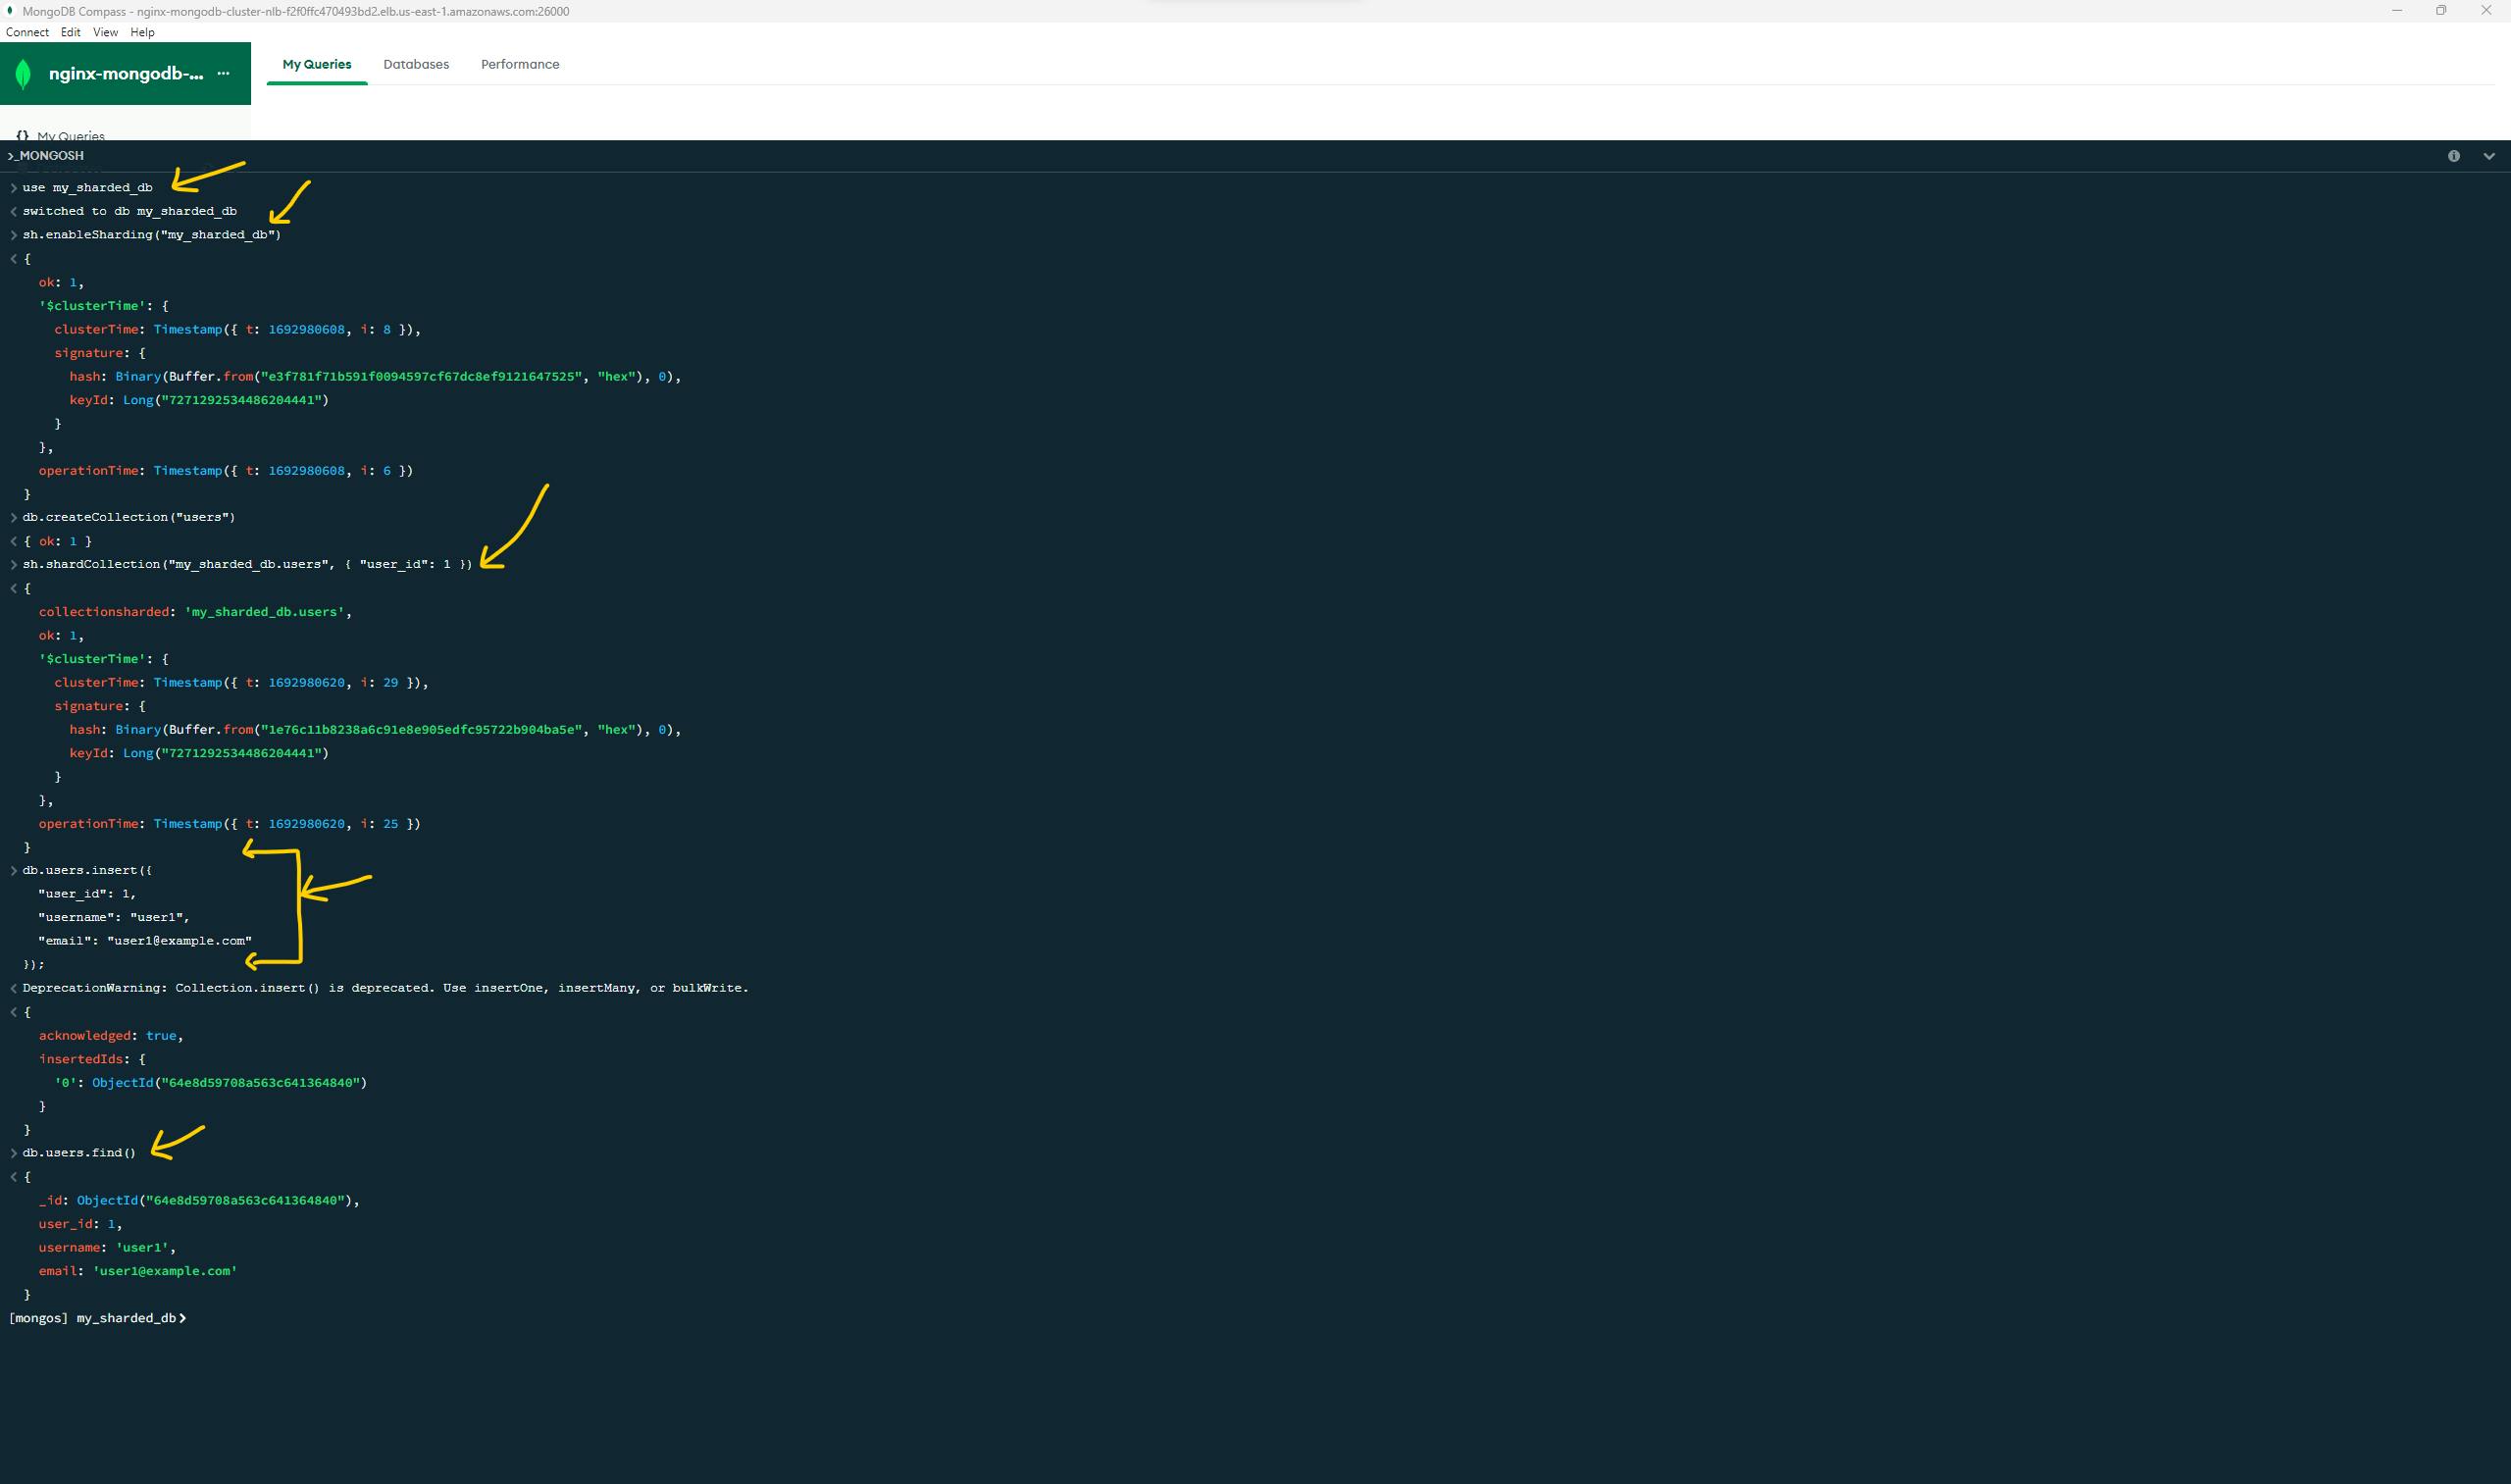
let's add some documents and perform some basic operations.
use my_sharded_db

sh.enableSharding("my_sharded_db")

db.createCollection("users")

sh.shardCollection("my_sharded_db.users", { "user_id": 1 })

db.users.insert({
  "user_id": 1,
  "username": "user1",
  "email": "user1@example.com"
});

db.users.find()

Want to add some more documents or data? here are some sample data that you can add.
db.users.insert({
  "user_id": 2,
  "username": "user2",
  "email": "user2@example.com"
});


db.users.insert({
  "user_id": 16,
  "username": "newuser",
  "email": "newuser@example.com"
});


db.users.insert({
  "user_id": 17,
  "username": "anotheruser",
  "email": "anotheruser@example.com"
});

db.users.insert({
  "user_id": 18,
  "username": "randomuser1",
  "email": "randomuser1@example.com"
});

db.users.insert({
  "user_id": 19,
  "username": "john.doe",
  "email": "john.doe@example.com"
});

db.users.insert({
  "user_id": 20,
  "username": "jane.smith",
  "email": "jane.smith@example.com"
});

db.users.insert({
  "user_id": 21,
  "username": "user123",
  "email": "user123@example.com"
});

db.users.insert({
  "user_id": 22,
  "username": "testuser",
  "email": "testuser@example.com"
});
Resource cleanup
opens the terraform repo in any code editor of your choice. open /CICD/buildspec.yml the file and just comment out the terraform apply command and uncomment the terraform destroy command.

commit the change and push it to the remote repo(AWS CodeCommit). we have a pipeline that will run the destroy command and destroy everything that is created by Terraform.

Conclusion
Through Ansible and Terraform, we've built a Production-ready MongoDB cluster and deployed Nginx on AWS. Our streamlined pipelines showcase the power of automation and efficient management.
if you reached here means you learned so much. and thank you so much for being part of this long journey.
🙋♂️ Ankit Jodhani.
📨 Reach me at ankitjodhani1903@gmail.com
🔗 LinkedIn https://www.linkedin.com/in/ankit-jodhani/
📂 Github for Terraform repo: Click me
📂 Github for Ansible repo: Click me
😺 Github https://github.com/AnkitJodhani
🐦 Twitter https://twitter.com/Ankit__Jodhani
Resources
MongoDB University: https://learn.mongodb.com/courses/m103-basic-cluster-administration
YouTube: https://www.youtube.com/@NeerajGarg